Requirements
- HTTPS is REQUIRED:
For security reasons, Facebook asks you to use an https:// URL while setting up webhook (See setup Webhook section), so you need to install component on website which supports HTTPS protocol. In other words, your website must support HTTPS protocol to be able to use chatbot service.
- Joomla Version: Joomla 3.2+
- PHP cURL extension is installed and enabled
Install extension
- Download extension from Geek Facebook Chatbot product page
- Install it via Joomla Installer as other extension
Get Callback URL from dashboard
Once the component installed successfully, you will be redirected to Dashboard page of Geek Chatbot component where you can get Callback URL and Verify Token to setup webhook for your Facebook App on next steps (See setup Webhook section)

Create FB Page
- The Facebook page will be an entry point for communication where the bot interacts with your page fans/users. You can create a new Page or use existing ones. The Page profile picture and name will be used to form the "identity" of your bot, they are displayed when users engage the page.
- Note that your Page does NOT have to be publicly visible.
Create and setup FB App
Create FB App
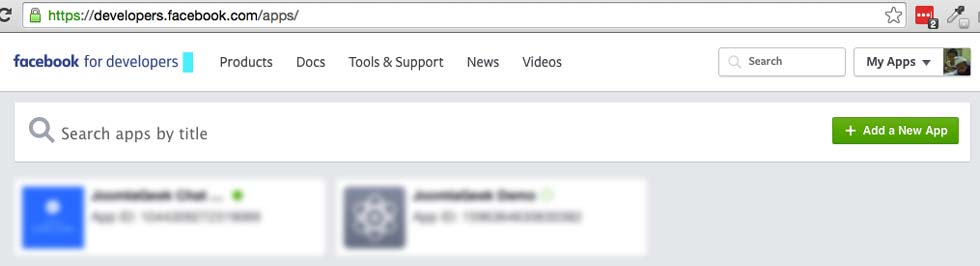
Go to https://developers.facebook.com/apps and click on Add a New App button. Facebook Developer Account is required to create an app so that you will need to create a free account if you do not have.
Follow step by step below to create an account.
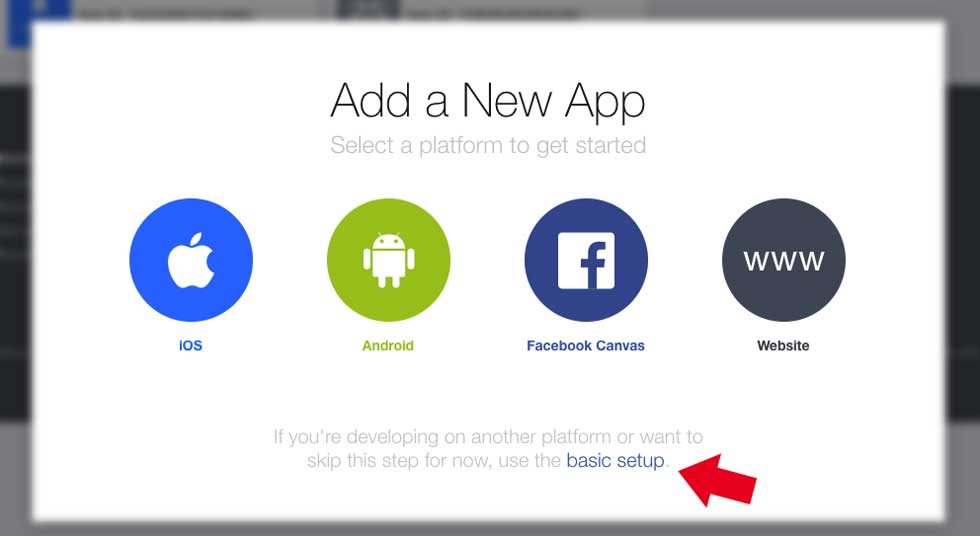
Step 1 - On popup dialog box , select a Basic Setup at the bottom
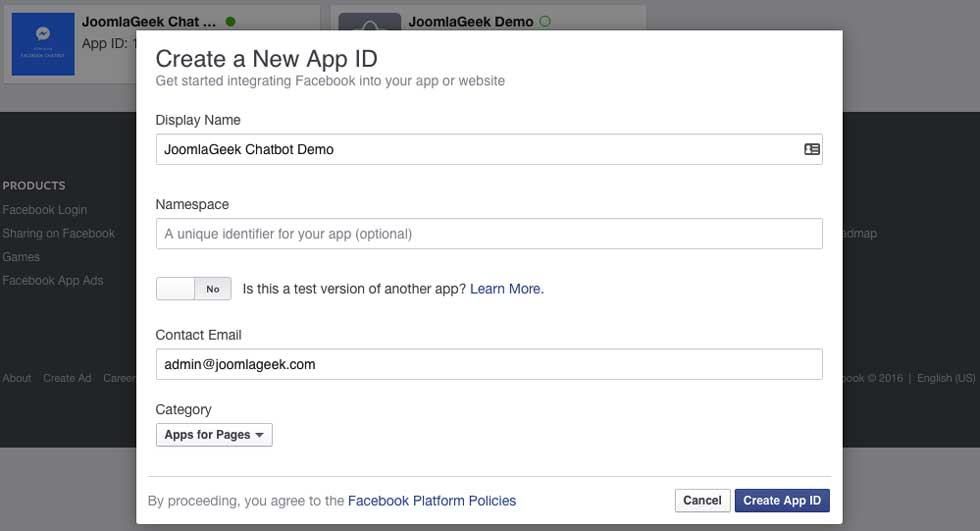
Step 2 - Enter necessary information, then click on Create App ID button
Step 3 - Once you submit a form, you will be redirected to app setting page.
Click "Add Product." on left sidebar -> Select "Messenger" from Product Setup section.
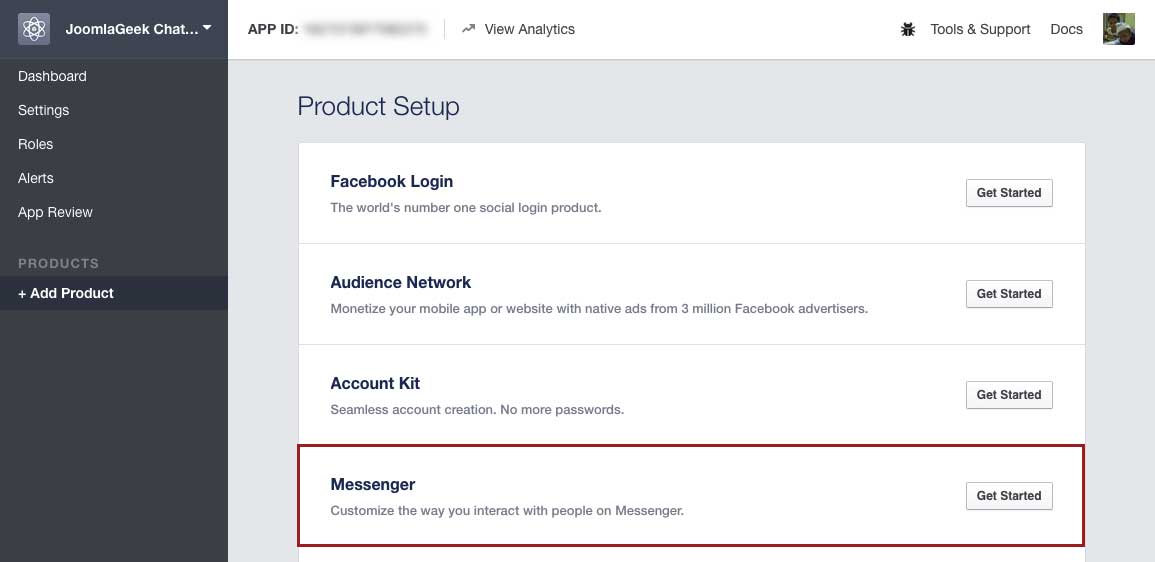
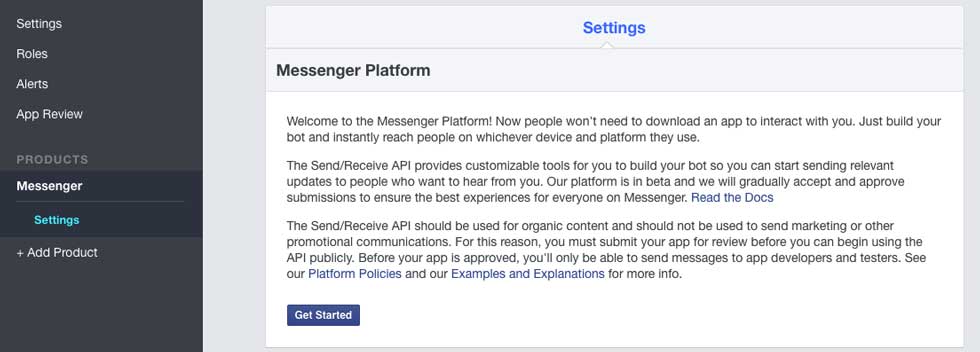
Step 4 - Click on Get Started button on introduction page of Messenger Platform to continue.
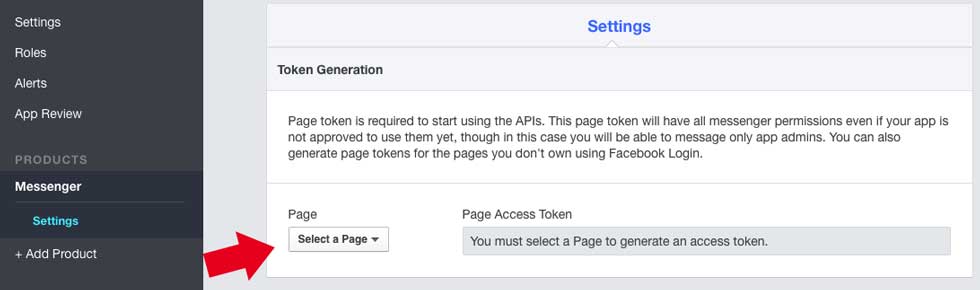
Page Token Generation
Page token is required to start using the APIs. This page token will have all messenger permissions even if your app has not been approved to use them yet. In this case you will be able to message only app admins.
If you want to invite more people to test your app before it is published then click on Roles menu on the left sidebar of App settings page to open the page -> Add more administrators, developers or testers of your app.
On the Token Generation section, select your desired Page from Select a Page dropdown list.
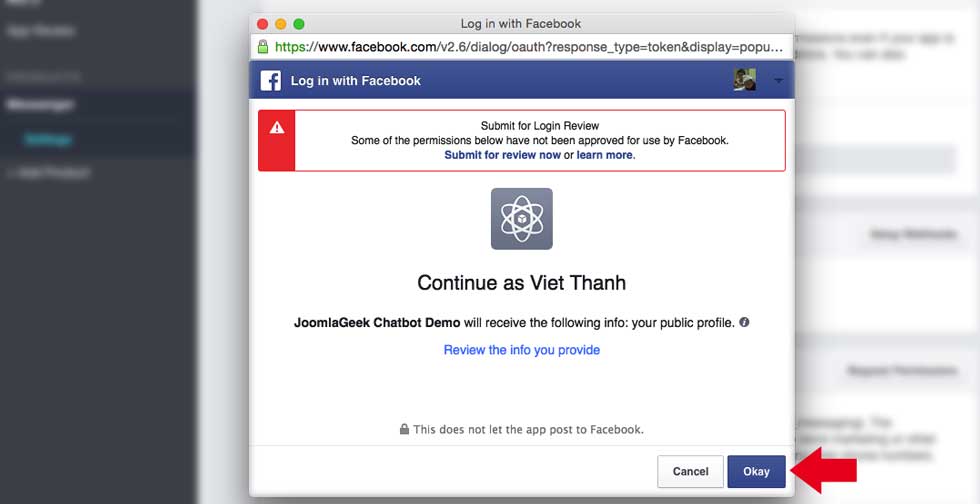
After selecting a page, there will be a popup window asking for some permissions, click Okay button to continue.
 After completing the configuration, Page Access Token will be generated for you. Now, save this Page Access Token somewhere, the Token will be used as access_token while sending messages.

Setup Webhook
To receive messages and other events sent by Messenger users, the app should enable webhooks integration. Webhooks (formerly known as Real Time Updates) enables apps to subscribe changes in certain pieces of data and receive updates in real time.
Read the referenced to learn more how to setup a webhook docs on Facebook for developers website.
Guide to setup Webhook
Step 1- Under the "PRODUCT SETTINGS" section, click on the "Messenger" product you just added, find the Webhooks section and click Setup Webhooks.

Step 2 - Enter a URL for a webhook then enter a Verify Token (You can find these data on dashboard of Geek Chatbot component - see Get Callback URL section) and select message_deliveries, message_echoes, message_reads, messages, messaging_account_linking, messaging_optins, messaging_postbacks under Subscription Fields.
Step 3 - Click on Verify and Save button to continue
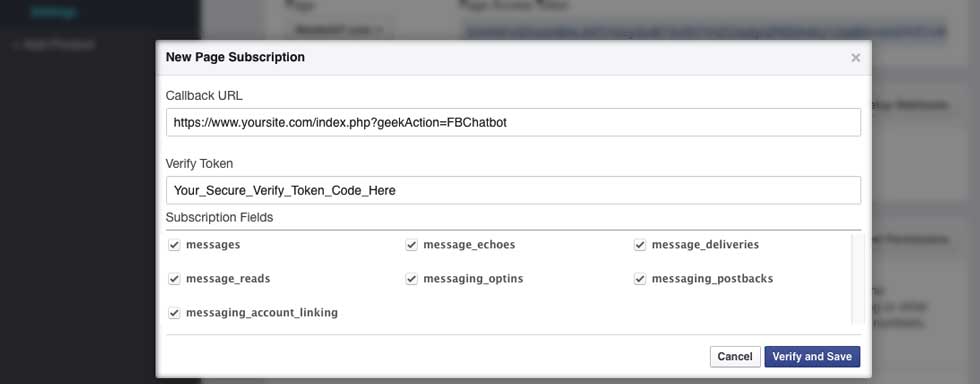
if everything goes well, you will see something like this
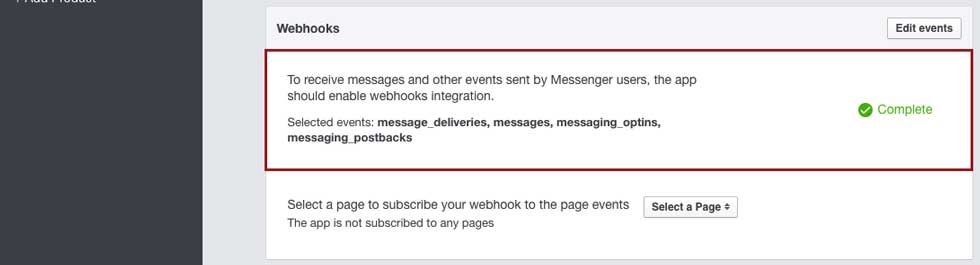
Subscribed App for a Facebook Page
You can subscribe an app to get updates for a page by selecting a desired page from Select a Page dropdown list in the Webhooks section, then click on Subscribe button
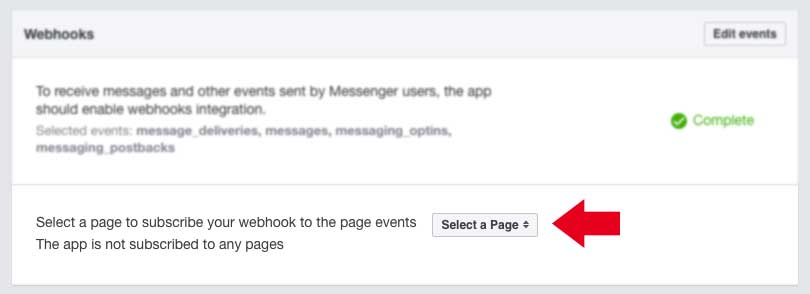
If the page is subscribed successfully, you will find it on the Subscribed pages list

Configure Chatbot
How to Access
Click the Options toolbar button on any screen.
Description
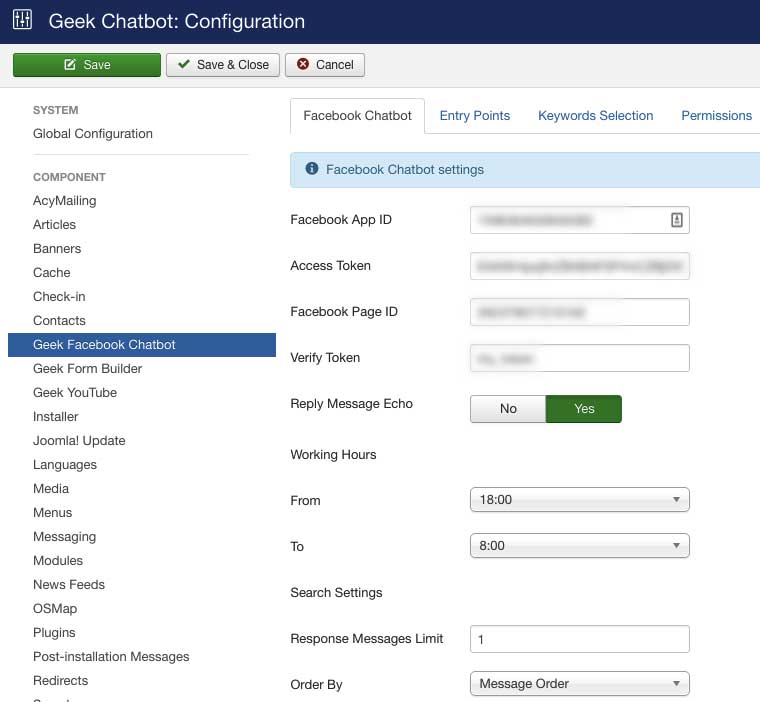
This is used to configure chatbot and entry points.
Screenshot
| Setting | Description |
|---|---|
| Facebook App ID |
ID of Your Facebook Application. You can find App ID on your Facebook App page.
|
| Page Access Token |
The Access Token is the one you saved from Page Token Generation step. Facebook Page Access Token is required to start using the Facebook Messenger Platform APIs. |
| Facebook Page ID |
ID of Your Facebook Page. Where to find your Facebook Page ID: Open your Facebook Page > Click on About tab > You can find Facebook Page ID at the bottom of Page Info section |
| Verify Token |
This is a security check so that your server knows the request made by Facebook and the verification is related to your application. You will be asked for token verification when creating new Webhook Subscription for your Facebook App. IMPORTANT: For security purpose, you need to change the default value of verify token before creating new Webhook Subscription on your Facebook app |
| Reply Message Echo | See Reply Message Echo section |
| Working Time | See Set Working Time section |
| Response Messages Limit | Set a number of response messages sent to user if there is more than one message matching with received message. |
| Order By |
An option which will allow you to display the message in a sorted order |

Reply Message Echo
Message Echo Callback: This callback will occur when a message has been sent by your page.
If you enable this setting then Bot will listen and reply message has been sent by your page as it does with user messages.
This can work like a shortcuts of other live chat support systems. This allows page admin to quickly send a message of bot to user while chatting. In this case, only you know a keyword to get a reply message from Bot but user does not.
For example: If your user wants to ask about one of your products but he does not know which information to ask. Then you type some keywords about that product in your reply, the Bot will search and return detail information about it.
- This feature requires you to subscribe to Message Echo Callback by selecting the message_echoes field when setting up your webhook.
- There must be only one Persistent Menu enabled. If there is a persistent menu already created, the option "Persistent Menu" will be disabled while creating new or editing other messages.
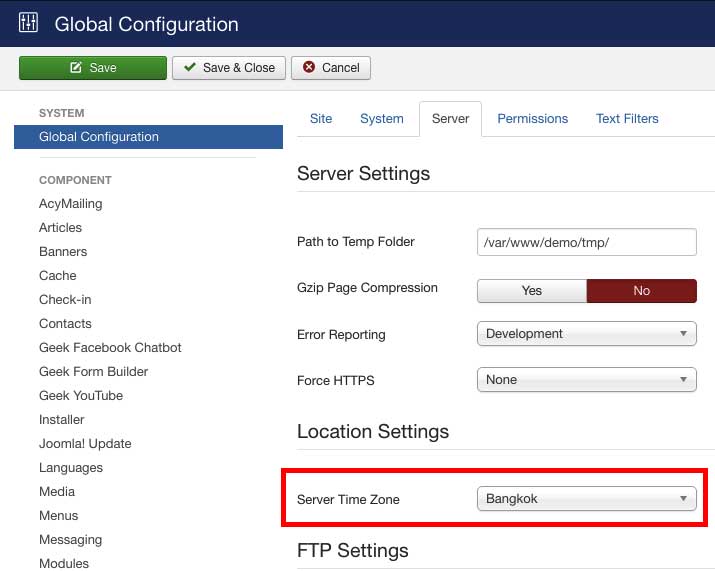
Set Working Time
By default, Bot will work 24/7 however this feature allows you to set working time for Bot.
You must set the value for both parameters From and To of Working time section to get an effect.
Timezone value is got from timezone setting of site configuration (System -> Global Configuration -> Server Tab)
Entry Points Tab

People can discover and enter into a conversation with your bot from a number of entry points There are two new plugins including message us plugin and send to messenger plugin that you can drop into your website. These plugins work on both desktop and mobile web.
Customer Chat plugin
The Messenger Platform's customer chat plugin allows you to integrate your Messenger experience directly into your website. This allows your customers to interact with your business anytime with the same personalized, rich-media experience they get in Messenger.
The customer chat plugin automatically loads recent chat history between the person and your business, meaning recent interactions with your business on messenger.com, in the Messenger app, or in the customer chat plugin on your website will be visible. This helps create a single experience for your customers, and enables you to continue the conversation even after they have left your webpage. No need to capture their information to follow up, just use the same conversation in Messenger.
Whitelist the domain of your website
For security reasons, the Customer Chat plugin will only render when loaded on a domain that you have whitelisted.
You can add or remove whitelisted domains via Facebook Page settings.
Please follow the blog post below for how to enable Customer Chat plugin on your website:
Message Us
The "Message Us" plugin takes the users directly to Messenger and allows them to initiate a conversation with you.
| Setting | Description |
|---|---|
| Status | Enable button on website |
| Button Color | Set color of Button |
| Button Size | Set size of Button |
Send To Messenger
When users click on "Send to Messenger" plugin, you can initiate a conversation with them in Messenger.
| Setting | Description |
|---|---|
| Status | Enable button on website |
| Data Reference |
You can use this parameter to send message to Chatbot. When user clicks on Send-to-messenger button, Chatbot will send corresponding message to user. E.g: You can set value for this parameter is “Hello”, then user click on this button, app will send message with content “Hello” to Chatbot, and chat bot will send reply message with keyword Hello to user. |
| Button Color | Set color of Button |
| Button Size | Set size of Button |
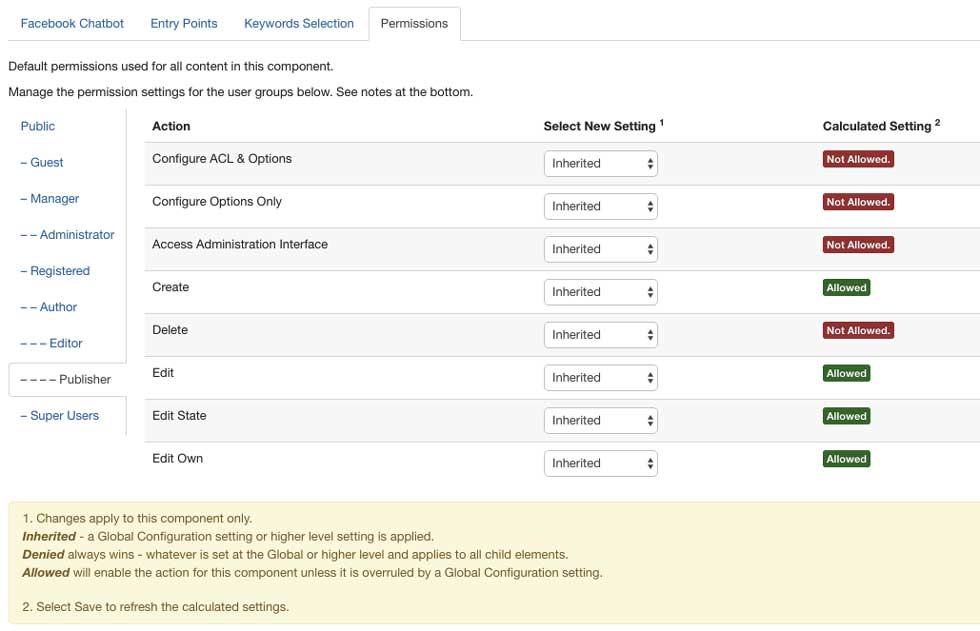
Permission Tab
Manage Messages
Message is what send to user on messenger.
This page provides functions of creating new, editing, publishing, unpublishing and deleting messages. See Toolbar for a detailed list of all functions.
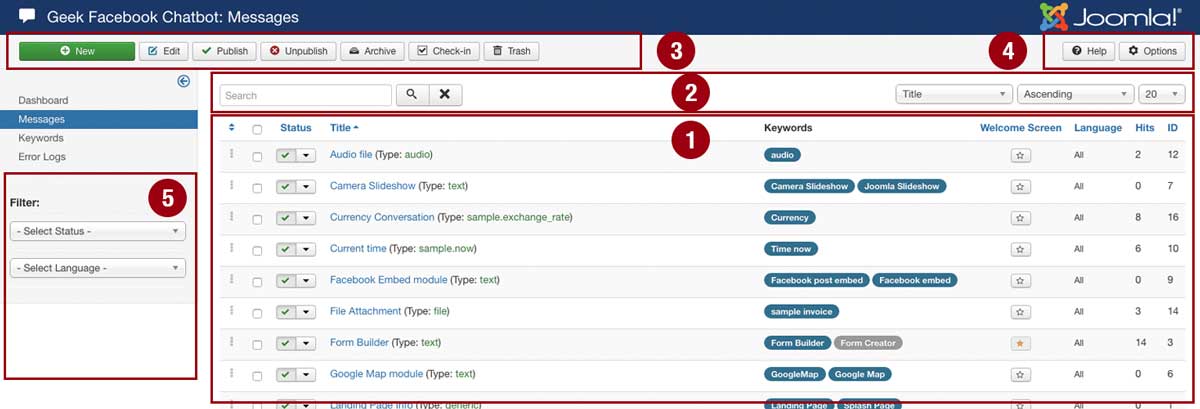
1. List of Messages
- Click on the column heading to sort the list by that column's value.
- Click on the name of message to edit the message
- Keywords column show keywords what assigned to message, the blue ones are published keywords, and the grey ones are unpublished keywords.
- Click on White Star buttons to set message as Welcome Screen message (see Create message section for more information about Welcome Screen)
2. Search and Order
- Use search field to search message by title
- Tip: use prefix "id:" to search form by id of message exactly or uses prefix "author:" to search message by Creator.
- Use three dropdown boxes on right side corner to sort displayed items on the table and specify the number of items to display on one page, default value is 20 items.
3. Toolbar
- New - Open a page to create a new Message.
- Edit - Open a page to edit a the selected Message. If more than one Message is selected (where applicable), only the first Message will be opened. The editing message page can also be opened by clicking on the Title or Name of the Message.
- Publish - Make selected Messages available to visitors.
- Unpublish - Make selected Messages unavailable to visitors.
- Archive - Change status of the selected Messages which are archived. Archived Messages can be moved back to the published or unpublished state by selecting "Archived" in the Select Status filter and you can change the status of the Messages to Published or Unpublished as preferred.
- Check In - Check-in the selected Messages. This can work with one or multiple selected messages.
- Trash - Change the status of selected Messages which they are trashed. Trashed Messages can be recovered by selecting "Trashed" in the Select Status filter and you can change the status of the Messages to Published or Unpublished as preferred. To permanently delete trashed Messages, select "Trashed" in the Select Status filter, select the Messages to be permanently deleted, then click the Empty Trash toolbar icon.
4. Help and Options
- Help - Open Chatbot component's documentation page
- Option - Open Chatbot component's configuration page
5. Filter
Filter by State, Access and Language
The selections may be combined. Only items matched all selections will be displayed on the list.
- Filter by Status - Use the drop-down list box to select the published state: Published, Unpublished, Trashed or All. Important: With the default setting of [Select Status] the screen only shows Published and Unpublished items. If you have the filter set to [Select Status] and you change items to Trashed, the Trashed items will disappear from the screen. However, they have not been permanently deleted. To delete permanently you need to:
- Change the filter to Trashed. The Delete icon will now show in the toolbar.
- Select the items you want to permanently delete.
- Click on the Delete icon.
You can see all items regardless of their published state by selecting All for this filter. You can also re-publish Trashed items by selecting them and clicking on the Publish icon on the toolbar.
Create Message
You can add a Form or edit an existing Form on the following page.
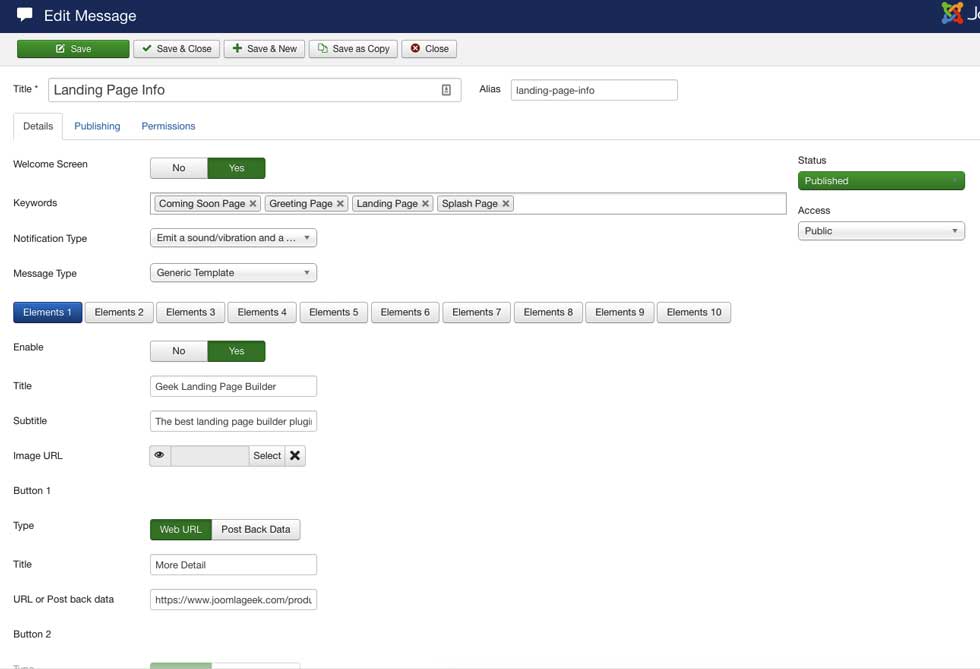
Welcome Screen
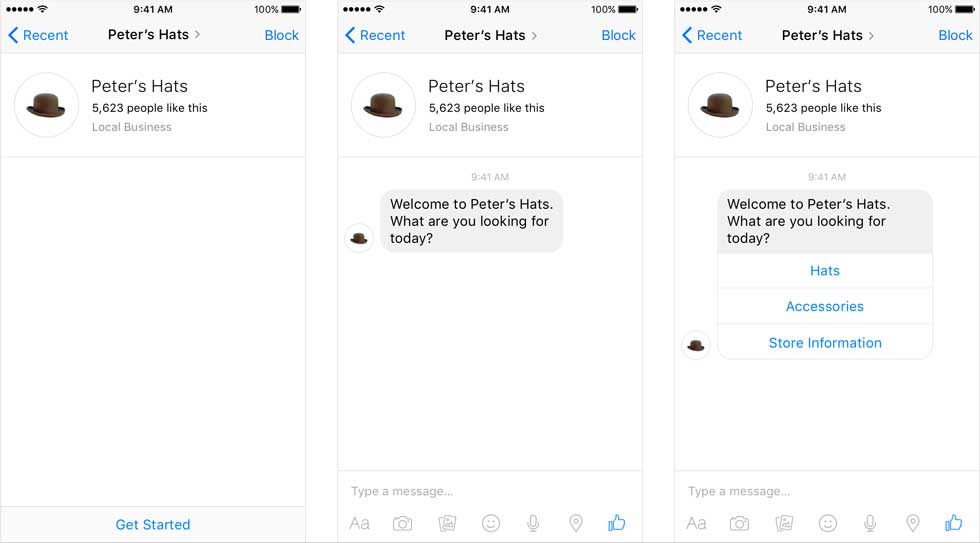
A person may enter an empty thread with your Page. Some examples include discovering your Page in search or clicking on a "Message Us" button. In these cases, you can present a Welcome Screen to greet the user and show buttons to prompt the person to take an action. The welcome screen displays a Get Started button. When this button is tapped, you can send a text message or a Structured Message.
The Welcome Screen only appears for new conversations. On mobile, deleting conversations will not cause the Welcome Screen to appear again. On desktop web, if you delete the conversation, you can make the Welcome Screen appear again.
Keyword system
Assign keywords to message. These keywords are used to define which messages will be sent to user.
You can select existing keywords from the list or create new keywords on this screen by typing a keyword name then press enter key to add new keyword, you can add as many as keywords you want.
Messages can have some same keywords, and bot will use some select messages to send to user by its own formula.
Learn more about How Chatbot work section
Notification type
Specify how message will be notified to user.
REGULAR will emit a sound/vibration and a phone notification;
SILENT_PUSH will just emit a phone notification,
NO_PUSH will not emit either
Message Type
There are 8 types of message
- Text is used to send text on your conversation.
- Image is used to send image on your conversation.
- Audio is used to send audio on your conversation.
- Video is used to send video on your conversation (Videos and audio clips play natively in Messenger).
- File attachment is used to send attached file for downloading.
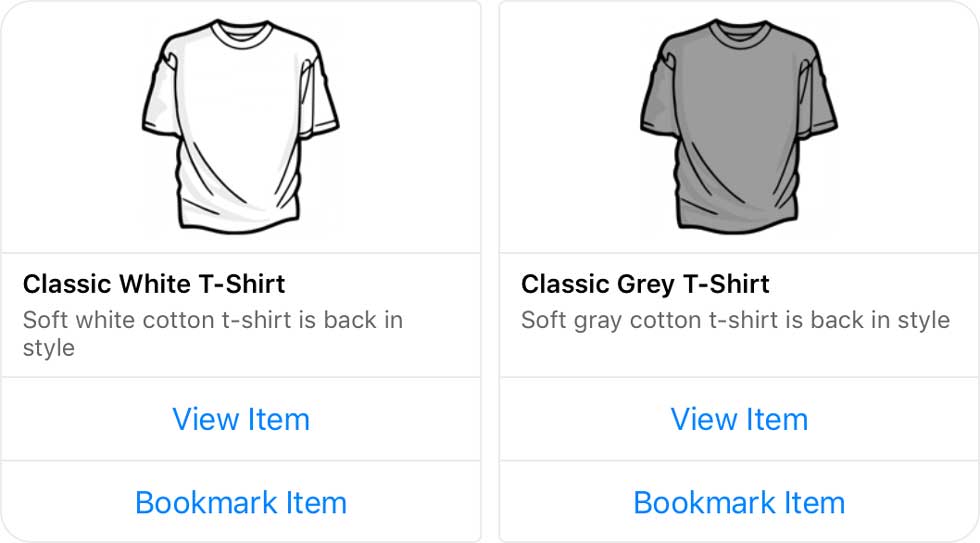
- Generic template: The Generic Template can include an image, title, subtitle, description and buttons. The template can support multiple bubbles per message and display them as a horizontal list.
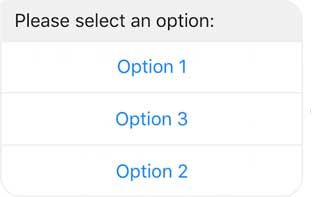
- Button: The Button Template is useful when you want to present simple text with options.
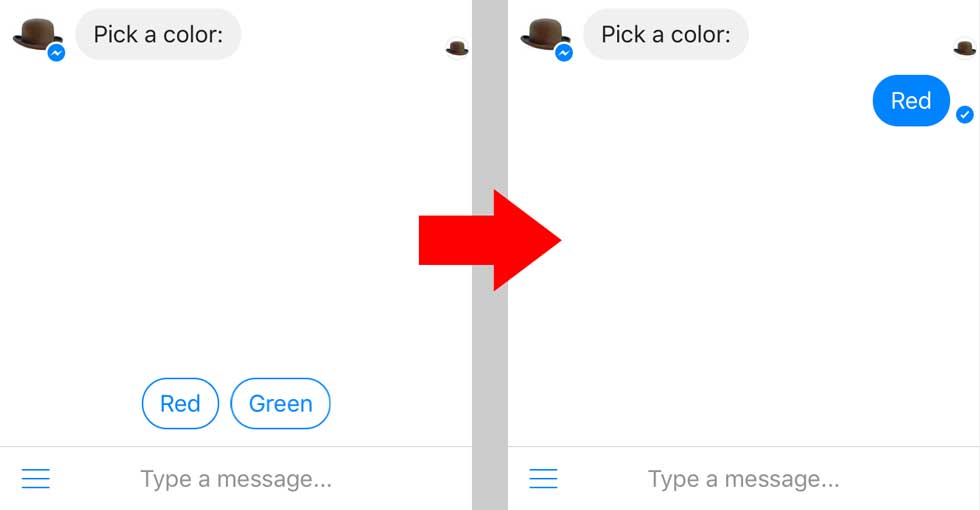
- Quick Replies: Quick Replies provide a new way to present buttons to the user. Quick Replies appear prominently above the composer, with they keyboard less prominent. When a button is tapped, the message is sent in the conversation with developer-defined metadata in the callback. After a button is tapped, the buttons are dismissed preventing the issue where users could tap on buttons attached to old messages in a conversation.
Button Type
There are two types of button which are Web URL and Post back data.
- Web URL button is an url link to somewhere you want (is like a normal link)
- Post back data button will send post back data to Chatbot to let your chatbot know what to do next. This is the way you can control the conversation. For example: you can create a button with Post back data is “Product A”, then user click on that button on messenger, then App will send message with content “Product A” to the chatbot, so Chatbot can send message about “Product A” information to user on messager.
Publishing
Click on Publishing tab to open the tab where you can configure Publishing settings. The tab is shown as follows.
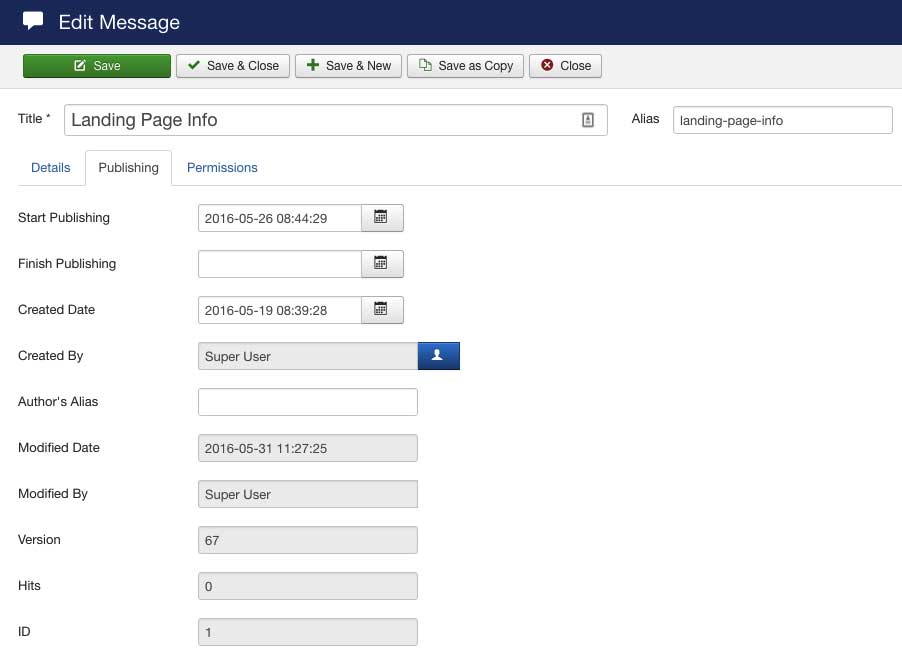
- Start Publishing - Date and time to start publishing. Use this field if you want to enter content ahead of time and then have it published automatically in the future.
- Finish Publishing - Date and time to finish publishing. Use this field if you want to have content automatically changed to Unpublished state in the future (for example, when it is no longer applicable).
- Created Date - Default value of this field is set to current time when the Form created. You can set different date and time value by manually entering value or clicking on the calendar icon to set the desired date.
- Created by - Name of the Joomla! User who created this item. Default value is set to the currently logged-in user. If you want its value, click on the Select User button to select a different user.
- Created By Alias - This optional field allows you to enter an alias for an Author’s Article. This allows you to set different Author name for an Article.
- Modified Date - (Informative only) Date of last modification.
- Modified By - (Informative only) Username who performed the last modification.
- Version - (Informative only) Number of version to this item.
- Hits - The number of times an item has been viewed.
- ID - This is an unique identification number for this item assigned automatically by Joomla!. It is used to identify the item internally, and you cannot change this number. When creating a new item, this field displays 0 until you save the new entry, at which point a new ID is assigned to it.
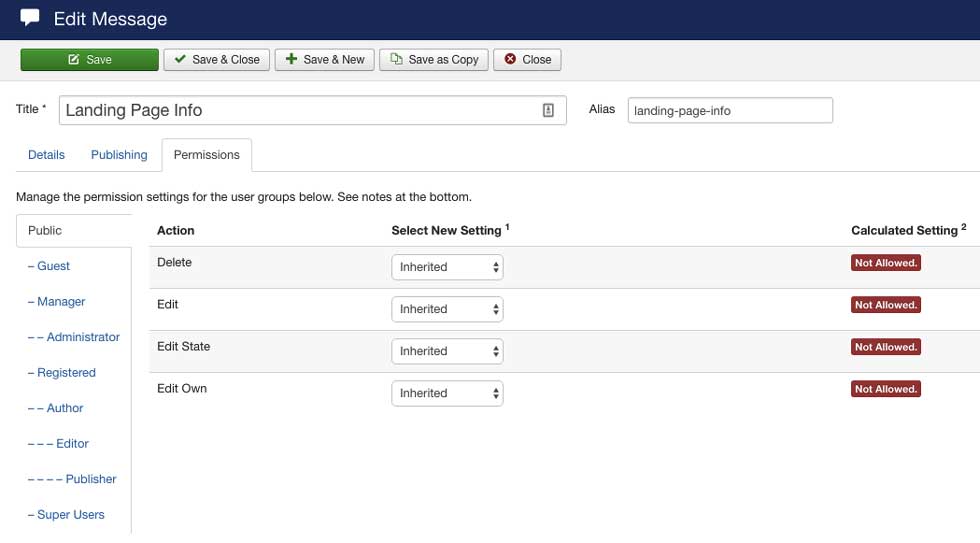
Permission
You can set permissions for one Message on the page belows:
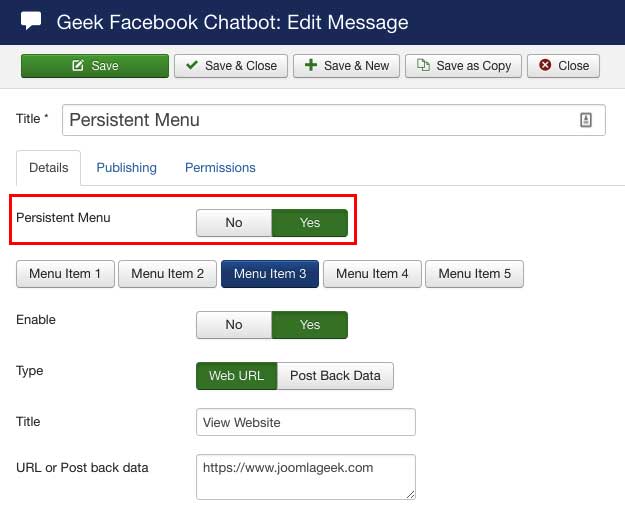
Persistent Menu
The Persistent Menu is a menu that is always available to the user. This menu should contain top-level actions that users can enact at any point. Having a persistent menu easily communicates the basic capabilities of your bot for first-time and returning users. The menu can be invoked by a user, by tapping on the 3-caret icon on the left of the composer.
- When creating a message, you will see an option to enable Persistent Menu. Choose Yes to enable
- Specify the menu item information (support up to five custom actions)
- Save the message
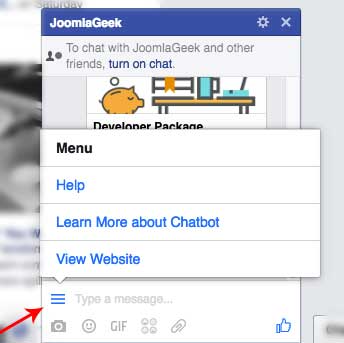
Now open the chat window, there is a three caret icon next to "Type a message" field. Click on the icon, you will see the created menu items as below
Message variables
Message variables can be used to send personalized messages to users. For details, you can insert variables to display the first name or last name of users in a message.
List of supported variable:
| Variable code | Variable description |
|---|---|
| [first_name] | Displays the first name of your user. |
| [last_name] | Displays the last name of your user. |
For example: you can enter a message content as follows:
Hi [first_name],
How can we help you?
Custom Integration Message
In version 2.0.0, Geek Chatbot Component support hooks which allow developers to write plugin to hook into events,
get data then create and send message based on the data.
This wonderful feature support to extend function of Bot, you now can write plugin to access and get data to other 3rd components and Web services then send messages to users.
For example: Items' data of shop components and events or ticket's data of event management components or ticket booking system or weather data,.. Etc...
See How to build a custom integration plugin (For Developer)
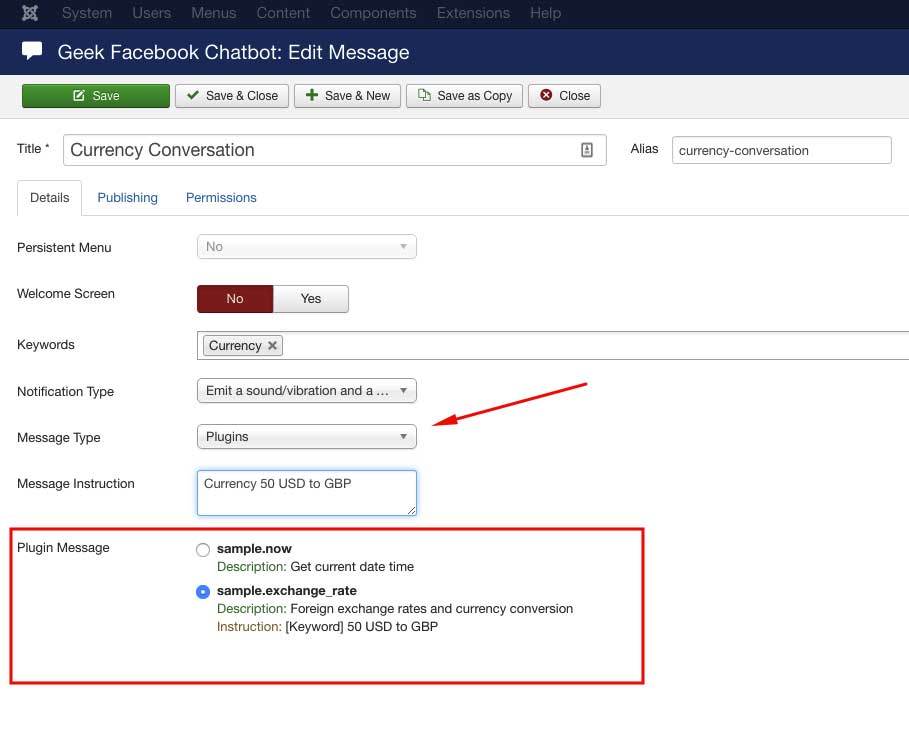
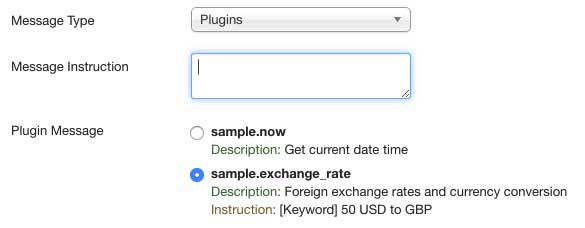
You will see Plugin option under the Message Type select box. If you select this option, then you will see the "Plugin Message" section where you can find all Custom Messages what supported by installed Integration Plugin
Support multilingual
The component provides the option to detect language automatically. Chatbot will detect which language users are using and automatically select the replied messages for that language. User language information will be got from locale setting of user facebook profile.
EX: If locale settings of user is en_US, Chatbot will select the messages assigned for English and all to send to users when chatting.
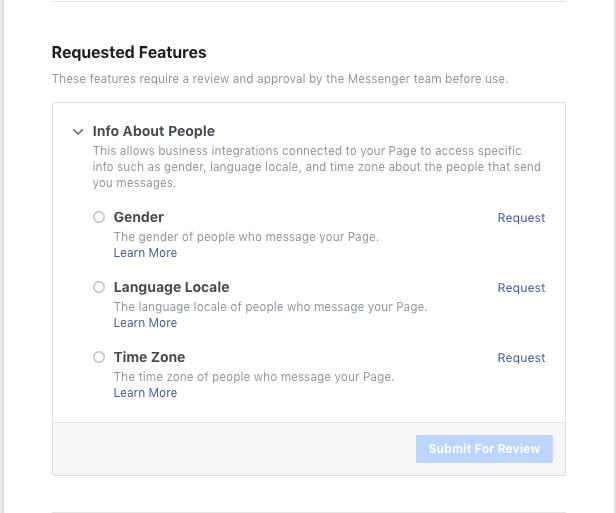
Requesting User's Language Locale
For multilingual feature, Chatbot will need to get information of language that users are using and send replied messages by that language.
But Facebook only allows your app to retrieve the id, name, first_name, last_name, and profile_pic fields of users by default.
And you need follow steps listed below to request feature access to user fields for the Page:
1. Go to Facebook Page Settings > Advanced Messaging
https://www.facebook.com/{Your-Page}/settings/?tab=settings
2. Under Info About People select the field Language Locale and click the Request button.
3. Once your request is approved, navigate to Configuration page of Geek Facebook Chatbot component > Subscribers tab > Enable setting Requested Users Locale to let Chatbot knows your Page already has a permission to get users Language Locale information.
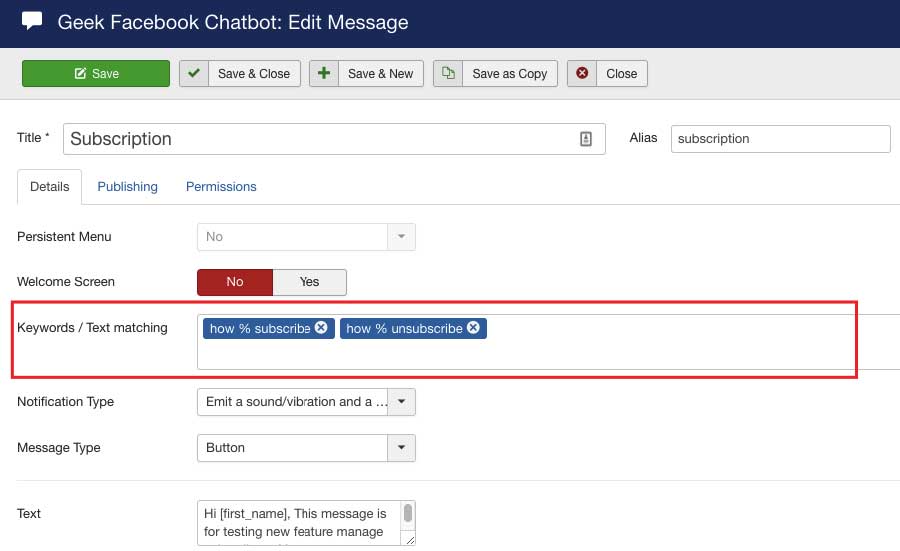
Manage Keywords / Text matching
This page provides functions of creating new, editing, publishing, unpublishing and deleting keywords / text matching. See Toolbar for a detailed list of all functions.
These keywords / text matching are used to define which messages will be sent to users based on the message that Chatbot received.
If User send a message that contain one of these keywords, then the compatible messages will be sent to them.
There is one important data of keyword is weight. Weight is a measure of keyword and phrase importance, that is - its value to the chatbot communication. Keyword with greater value of weight is more important than other keywords. And the message with these keyword will prefer to return to user. See How ChatBot Work section for more information.
Support SQL Like Syntax:
Beside using simple keywords, Chatbot also supports to define a text matching to check if the received message is matched with a specific format.
For details, You can use _ (underscore) character to match any single character and % (percent) character in text to match with any characters.
For example: If you define a text matching as follows
How % unsubscribe
Then it will match with all following texts:
- How I can unsubscribe from a list
- How do I unsubscribe from newsletter
- How I unsubscribe
- Let me know how to unsubscribe from a list
- ...
Subscription Messaging
This page provides functions of managing subscribers and sending mass messages to all subscribed users. See Toolbar for a detailed list of all functions.
Standard Messaging vs Subscription Messaging
If a business or developer is providing a live chat supported through the Send/Receive API, they have up to 24 hours to respond to a message initiated by a person in Messenger when using standard messaging. Each time a person responds to a business through one of the eligible actions, the clock will reset.
If a business or developer is unable to respond within the 24 hour window, they have the ability to respond with ONE additional message outside of the 24 hour window. This mean that Bots will not technically be able to message users more than once beyond the 24-hour window (message will not be sent).
If you want Bot to send more than one message beyond the 24-hour window policy, you have to request Subscription Messaging (pages_messaging_subscriptions) permission for your app.
Please navigate to Submit App to Review section for how to request permissions for your app.
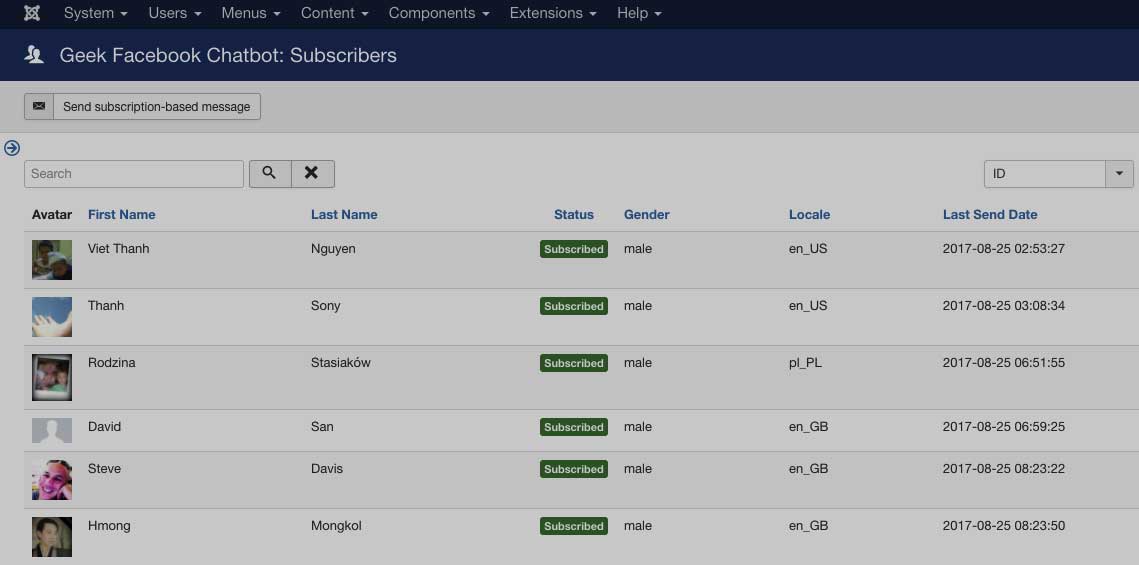
Manage subscribers
When users start a new conversation with a page on Facebook messenger, they will be automatically added to Subscribers list with status Subscribed by default.
Send mass / subscription-based messages
You can send mass messages to all subscribed users by clicking on "Send subscription-based message" button from the toolbar on Manage Subscribers page. It will open a modal box as follows
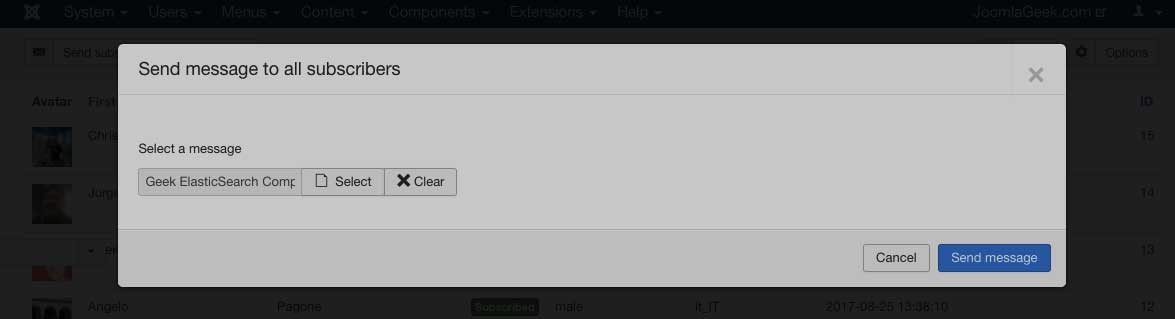
Select a message that you want to send, then click a "Send message" button. The selected message will be sent to all subscribed users.
Note: Do not close the modal box when messages are sending, wait until progress bar is reached 100% then you can safely close it.
Subscribe / Unsubscribe
You can implement a feature which enable users to subscribe or unsubscribe from the subscribers list by creating post back data buttons with corresponding payload is [SUBSCRIBE] and [UNSUBSCRIBE]
When users click on these buttons, their status will be updated and they will be also received a confirmation message.
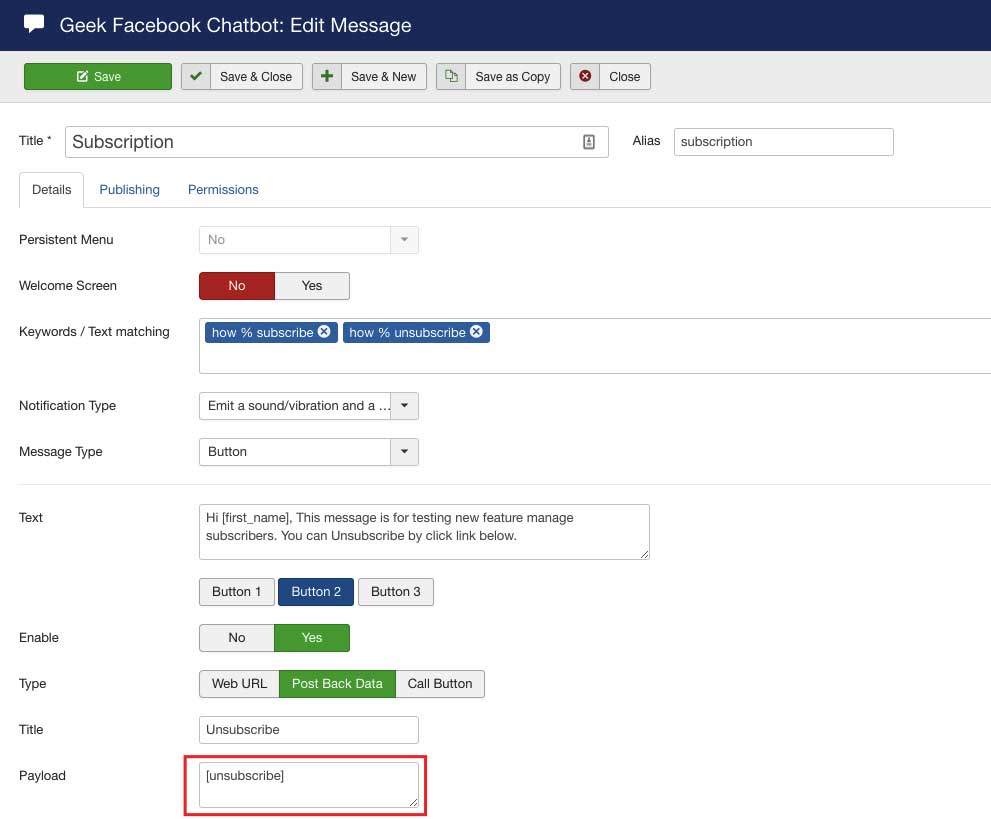
Unsubscribed users will no longer received the messages that you send from Joomla backend with "Send subscription-based message" feature.
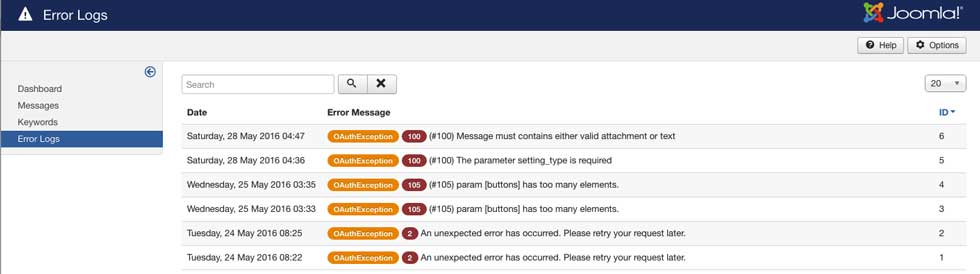
Error logs
If you found something of Geek Chatbot does not work properly, this is useful place where you can check to see what happened and fix them.
How ChatBot Work
- Send and receive message
- Once an user starts a new conversation on messenger, The welcome screen message will be sent to user
- When an user sends a message, it will be sent to chatbot, chatbot will analyze message content and lookup corresponding reply message to send back to user.
- How message is selected
- Message Weight: The message weight will be calculated by sum up its keywords’ weight what found in content of received message.
- Messages with greatest weight will be selected
- If messages have the same weight, they will be ordered by ordering setting in configuration
- For example:
For assumption, your chatbot has following messages
| Message | Keywords | Ordering | |
|---|---|---|---|
| Text | Weight | ||
|
Geek Landing Page product info (#message1) |
Landing page | 2 | 1 |
| Splash page | 1 | ||
| Coming soon page | 1 | ||
|
Promotion info (#message2) |
Promotion | 1 | 2 |
| Coupon code | 1 | ||
| Discount code | 1 | ||
|
Thank you message (#message3) |
Thanks | 1 | 3 |
| Thank you | 1 | ||
| Bye | 1 | ||
If user sends a message with content below:
Hello, I would like to know more about Geek Landing Page extension. Could it be used to create splash page for Xmas? thanks
Then chatbot finds 2 keywords of #message1 are Landing Page (weight is 2) + Splash Page (weight is 3) => Weight of #message1 is 2 + 1 = 3
And found 1 keyword of #message3 is Thanks (weight is 1)
So, the message is selected is #message1
User continue to chat with message:
Is there any discount code when purchasing this extension, thanks?
Then Chatbot found two messages has the same weight are #message2 and #message3, but #message2 is selected, because it has higher ordering
NOTE: You can select order by ordering or create date, this setting can be found in configuration form of component.
Submit App to Review and publish your chatbot
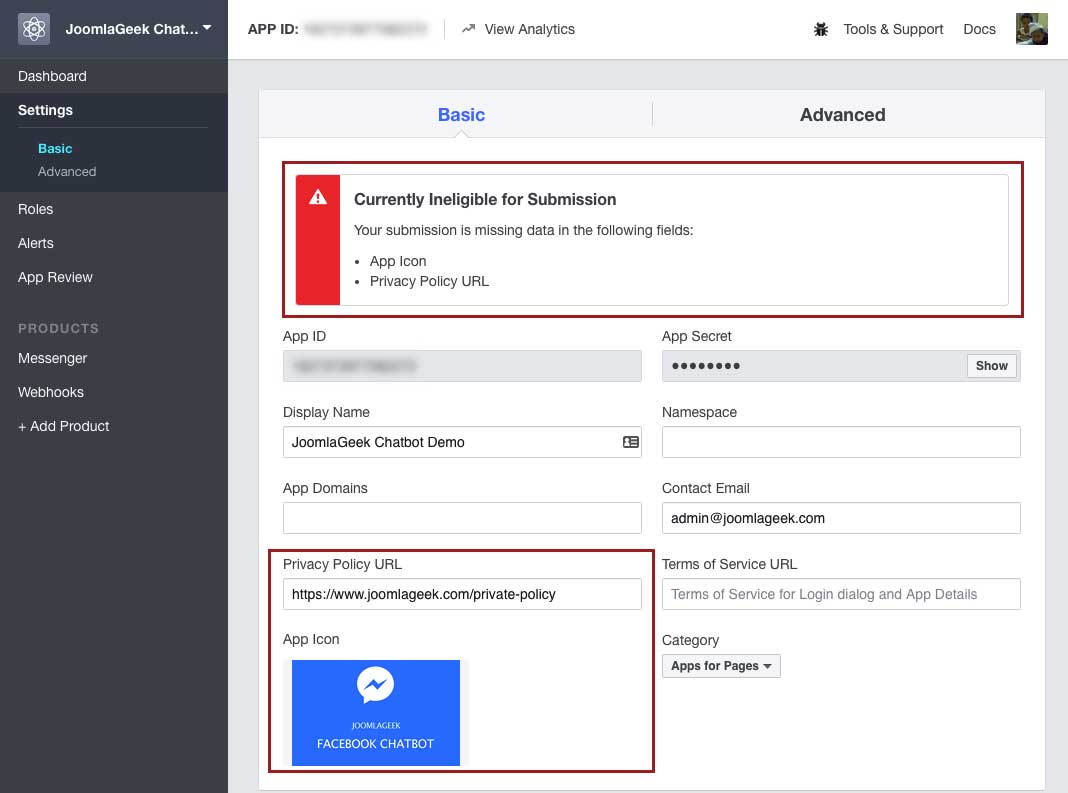
Update App Basic Info
Facebook requires your app to have App Icon and Privacy Policy URL to able to submit for review, so you need to update these information first.
Click on Settings tab on left side bar > Basic where you can update them.
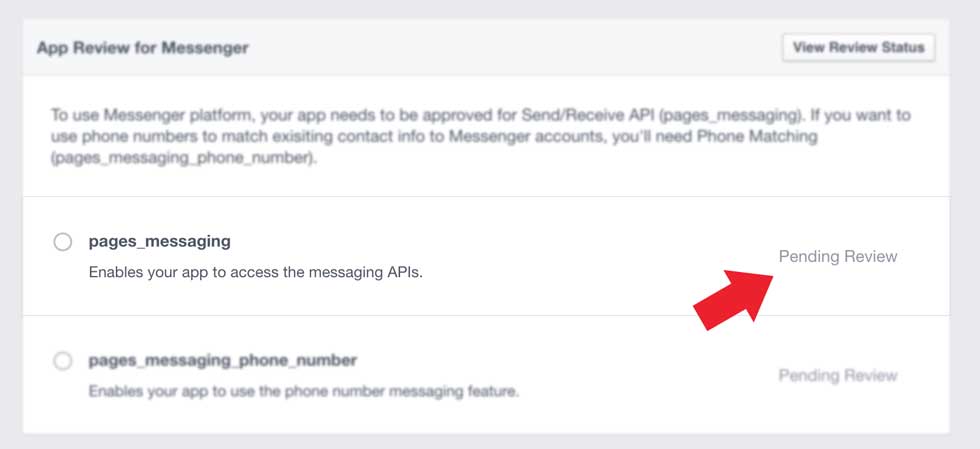
App Review Section
Go to the Messenger tab in the App Dashboard. Scroll down to the App Review for Messenger section.

Items for submission
Click on the "Add to submission" button next to the permissions that your app need. Geek Facebook Chat component require pages_messaging permission and pages_messaging_subscriptions permission, so you need to request these permissions for your app.
- pages_messaging (REQUIRED): Enables your app to send and receive messages using a Facebook Page.
- pages_messaging_subscriptions (REQUIRED): Enables your app to send messages using Facebook Pages at any time after the first user interaction. This permission CAN'T be used to send advertising or promotional content.
- pages_messaging_phone_number (OPTIONAL): Enables your app to match phone numbers you already have to Messenger accounts. In order to use this permission, your app must be already approved for the Send/Receive API and based in the US.
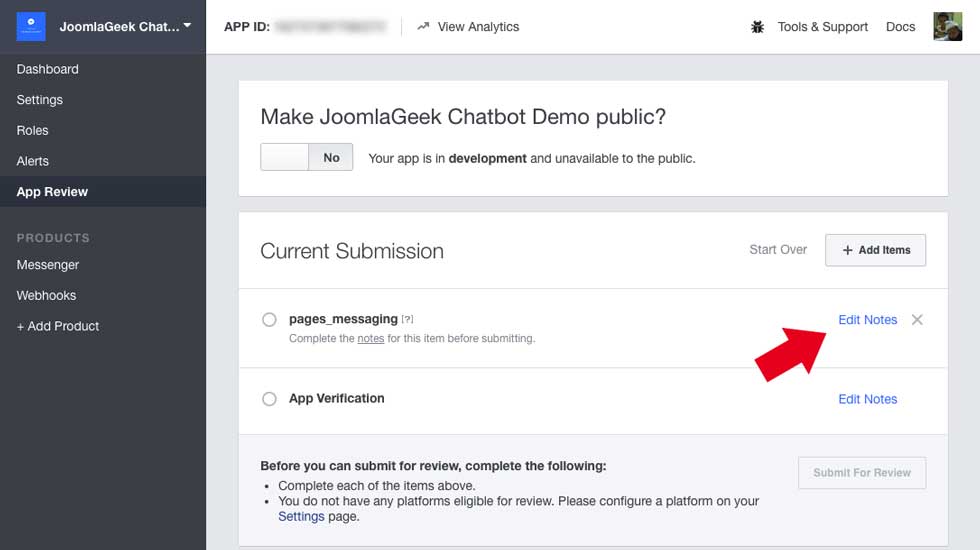
Edit Notes for each submission
After selecting the permissions, you can edit the notes for each submission.
Click on App Review menu on left sidebar > Click on Edit Notes for each permission you seek. Be sure to complete each form and any other missing items before clicking Submit for Review.
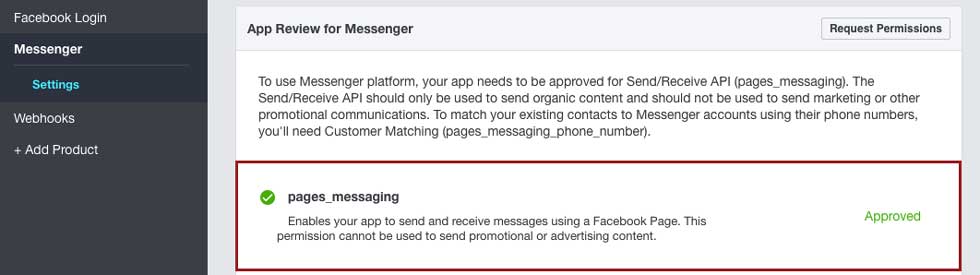
Submit and wait for Approval
Once you've submitted your app, you can view the App Review section to see the status of your approval.
Approval Alerts
When your app is approved, we will send you an Facebook notification. Also, the App Review section will show the status as approved.
Acceptable Use Case Examples and Explanations
The Send/Receive API is intended for non-promotional messages that facilitate a pre-existing transaction, provide other customer support actions, or deliver content requested by a person. The API must not be used to send marketing or promotional messages, such as sale or product announcements, brand advertising, branded content, newsletters or the up-selling or cross-selling of products or services.
Read the Messenger Platform section in the Platform Policies for further clarity.
Build Custom Integration (For Developer)
This section will guide you how to develop integration plugin to extend function of your Bot.
You will need at least two files for Plugin. An XML file and a PHP file.
This guide is for Developer, so we assume that you know how to develop Joomla plugins (any type of plugin).
XML File
The XML file of plugin is the same XML for other types of Joomla plugin.
There is only one thing that you need to pay attention to define that the plugin has to be a Geek Chatbot Integration Plugin, is this line:
<extension type="plugin" version="3.1" group="geekchatbot" method="upgrade">
The type will define it is a Plugin, the group defines the Plugin is in the group of Geek Chatbot Integration Plugins.
XML File - Example
<?xml version="1.0" encoding="utf-8"?> <extension type="plugin" version="3.1" group="geekchatbot" method="upgrade"> <name>Geek Chat Bot - Sample Plugin</name> <author>JoomlaGeek</author> <creationDate>Jul 2016</creationDate> <copyright>Copyright (C) 2015 JoomlaGeek. All rights reserved.</copyright> <license>GNU General Public License version 2 or later; see LICENSE.txt</license> <authorEmail>This email address is being protected from spambots. You need JavaScript enabled to view it. </authorEmail> <authorUrl>www.joomlageek.com</authorUrl> <version>1.0.0</version> <description> <![CDATA[ Sample integration plugin for Geek Facebook Chatbot Component ]]> </description> <files> <filename plugin="sample">sample.php</filename> <filename>index.html</filename> </files> <languages> <language tag="en-GB">en-GB.plg_geekchatbot_sample.ini</language> </languages> <config> <fields name="params"> <fieldset name="basic"> </fieldset> </fields> </config> </extension>
PHP File
The PHP File is where you define a class with methods to create your own custom message.
Your class will be extension of the GeekChatbotHelperPlugin class
class plgGeekChatbotSample extends GeekChatbotHelperPlugin {
And class must have a method named setup what you will use to register your custom messages.
public function setup() {
	$this->code = 'sample';

	$this->registerTask(
		'now',
		'getCurrentDate',
		JText::_('PLG_GEEKCHATBOT_TASK_GETCURRENTDATE_DESCRIPTION'),
		JText::_('PLG_GEEKCHATBOT_TASK_GETCURRENTDATE_INSTRUCTION')
	);
	$this->registerTask(
		'exchange_rate',
		'getExchangeRate',
		JText::_('PLG_GEEKCHATBOT_TASK_GETEXCHANGERATE_DESCRIPTION'),
		JText::_('PLG_GEEKCHATBOT_TASK_GETEXCHANGERATE_INSTRUCTION')
	);
	$this->registerTask(
		'[custom_message]',
		'[callback function to create get data and return message]',
		'[Description of your custom message]',
		'[Instruction / format of request message what user must use]'
	);
}
where code is your plugin name, and the function registerTask is used to define your custom message.
After that, you need to define a callback function to get data (from your resource such as other components or web service) then return as message.
/**
 * @param GeekChatbotHelperMessages $helper - message helper object
 * @param $message - Facebook received message
 * @param $profile - Facebook User profile
 * @param $item - data object of message table
 *
 * @return object - Facebook response message
 */
public function getExchangeRate($helper, $message, $profile, $item) {
	//your own code to get data from 3rd extensions here
	$messageText = $helper->getMessageText($message);
	if($messageText) {
		if(preg_match('/([0-9.]+\s*)?([a-z]{3})\s+to\s+([a-z]{3})/i', $messageText, $matches)) {
			$amount = (float) $matches[1];

			$from = strtoupper($matches[2]);
			$to = strtoupper($matches[3]);
			$url = sprintf('http://api.fixer.io/latest?symbols=%s,%s', $from, $to);
			$data = json_decode(file_get_contents($url));
			if(!$data) {
				return false;
			}

			//{"base":"EUR","date":"2016-07-13","rates":{"GBP":0.83398,"USD":1.1072}}
			if(!isset($data->rates->{$from}) && $from != $data->base) {
				return $helper->buildTextMessage(JText::sprintf('PLG_GEEKCHATBOT_CURRENT_IS_NOT_SUPPORTED', $from));
			}
			if(!isset($data->rates->{$to}) && $to != $data->base) {
				return $helper->buildTextMessage(JText::sprintf('PLG_GEEKCHATBOT_CURRENT_IS_NOT_SUPPORTED', $to));
			}
			$rate1 = (float) (isset($data->rates->{$from}) ? $data->rates->{$from} : 1);
			$rate2 = (float) (isset($data->rates->{$to}) ? $data->rates->{$to} : 1);

			$rate = $rate2 / $rate1;
			if(!$amount) {
				return $helper->buildTextMessage(sprintf('1 %s = %f %s', $from, $rate, $to));
			} else {
				return $helper->buildTextMessage(sprintf('%f %s', $amount * $rate, $to));
			}
		}
	}
	return false;
}
Sample Code
We provide some sample plugins (plg_chatbot_sample), you can find these inside folder [plugins] of Geek Chatbot installation package.
When a plugin installed and enabled successfully, this plugin will be shown when creating a message as screenshot below.