Requirements
- cURL is installed and enabled.
-
Minimum Version Recommended Version Elasticsearch 2.3 7.x PHP 7.2.5 PHP 8.3 (or newer) - Please read this aritcle for How to Upgrade Your Website PHP Version
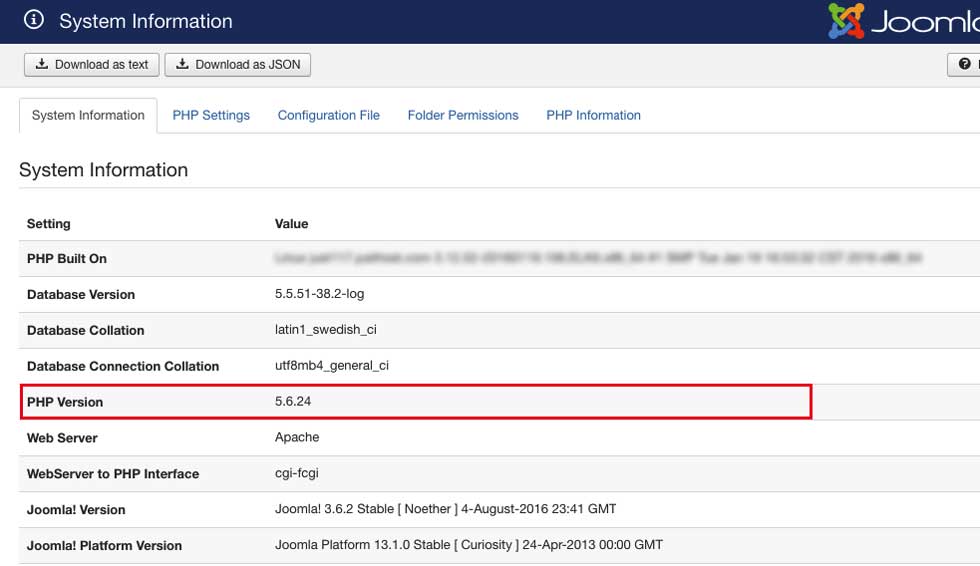
- How to check PHP version is running on your website
- From the Backend of Joomla site
- Go to System → System Information: this screen contains all system information you may need, the Joomla! Version currently running, and also PHP, database versions and so on.
-
Install Elasticsearch
Geek ElasticSearch component uses Elasticsearch as a search engine.
So you will have to configure component to connect with Elasticsearch service first in order to get the search module work.
If you have a dedicated server or VPS, you can follow the link below to free download Elasticsearch from its official website and install it to your server.
https://www.elastic.co/downloads/elasticsearch
You can find detailed documentation for how to install Elasticsearch to all server operating systems there.
- Install Elasticsearch with debian package
- Install Elasticsearch on Red hat with RPM
- You can also searching for documentation for how to install it on Ubuntu or other server OS.
Hosted ElasticSearch
If you use shared hosting that does not enable you to install Elasticsearch, then you need to use hosted Elasticsearch service of cloud search providers such as Searchly, Elastic Cloud or AWS.
Renting a hosted Elasticsearch service also helps you not worry about plenty of headache stuff like security, load balancing, node distribution, scalability. You can save time on operational overhead and focus on delivering business value by leveraging managed services.
Configure Searchly service
Searchly.com provides powerfull features to fulfill your Elasticsearch deployment with a reasonable price.
On this section, we will guide you how to create and configure Elasticsearch service on Searchly.
Searchly (recommended) is a reasonable price service and it's very easy to configure (take less than 10 minutes to configure).
It also supports free starter plan that enables you to create up to 20 search spaces, each can create 2 indices with 20MB of storage that can index about 5K of documents.
If you already have Elasticsearch service installed on your server or use Elasticsearch from another provider, you can use that one and skip this step. However, you need to manage permission to access your service by yourself.
Create Searchly account
- Open http://www.searchly.com/
- Select a plan that suits your needs
- It has a free "Starter" plan that enables you to create up to 10 Search spaces, and each can create 2 indices with 20MB of storage that can index up to 5K documents.
- Sign up and verify your account.
Create Search Space
- Once your account is verified, you can login its dashboard.
- You will be redirected to the page where you can create Search Space for the first time login.
-
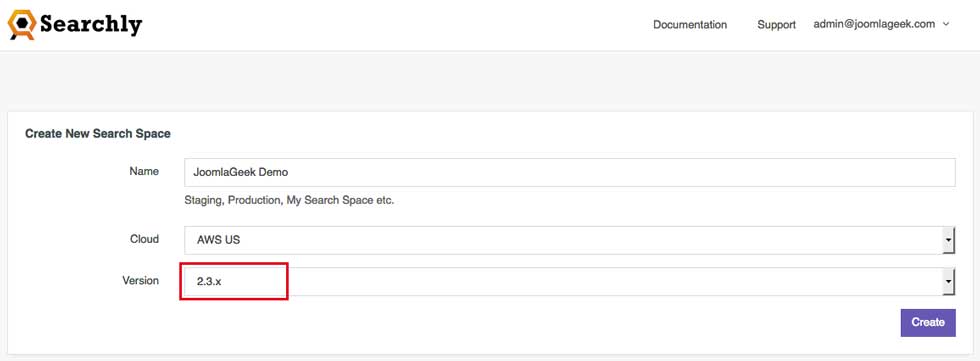
- Type a name for Search Space, select Region, and select version 7 (recommend), version 6, version 5 or version 2 for Elasticsearch version.
- Choose Create
Create Indices
- Searchly will grant access to specific indices. Hence, you need to create indices first, then create access key and grant access to them.
-
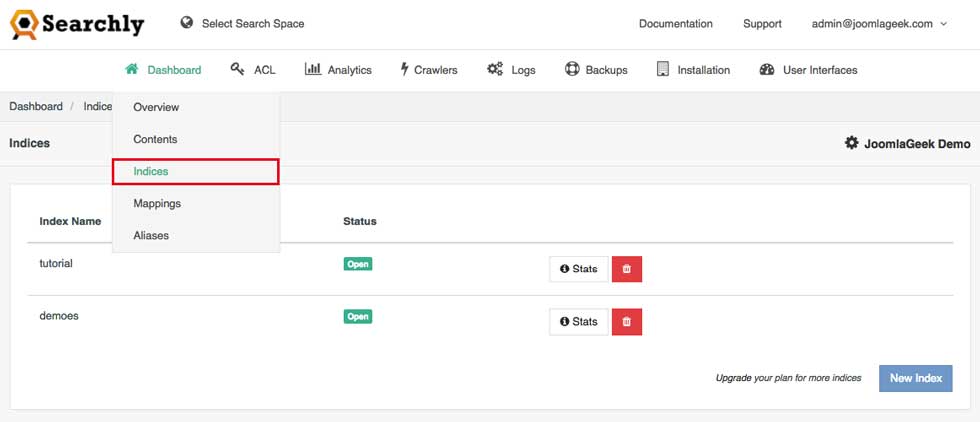
- Select Dashboard > Indices to open the Indices Manager page where you can create an index.
- Chose New Index
- On Create New Index form Enter index name
-
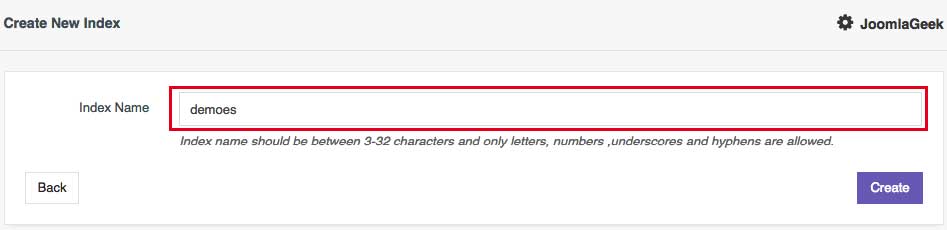
- Choose Create button
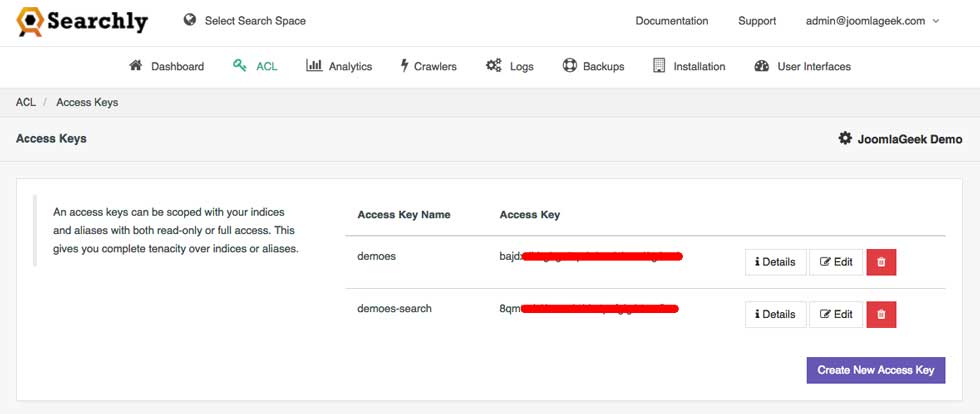
Create Access Keys and Set up Access Policy
You need to create 2 different Access Keys to index, one is for index request in back-end and one is for search on front-end. Select ACL > Access Keys to open the Access Keys Manager page where you can create an access keys.
Create Private Access Key for Index request
- Choose Create New Access Key
-
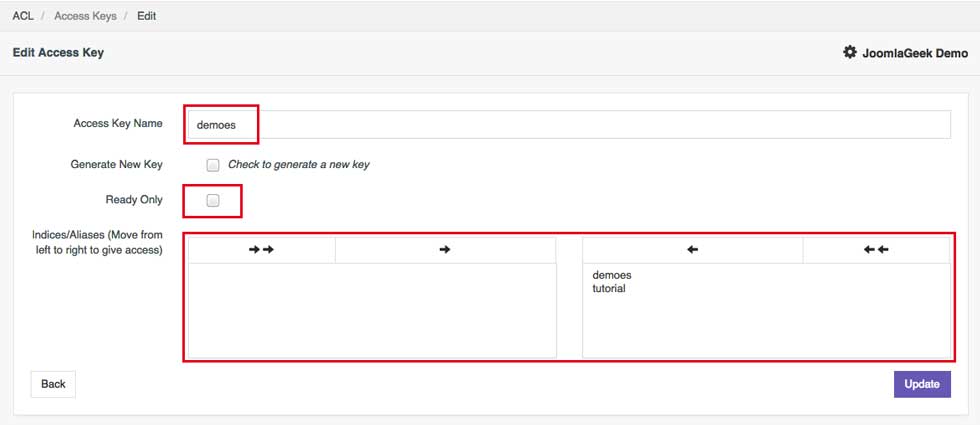
- Type Access Key Name
- Uncheck for Read Only option
- Select indices that you grant access for.
- Choose Create
-

- On the next screen. Copy the Connection URL and save it to a safe place. This URL will be used as Endpoint URL on the configuration page.
Create Public Access Key for Search request
- Choose Create New Access Key
-
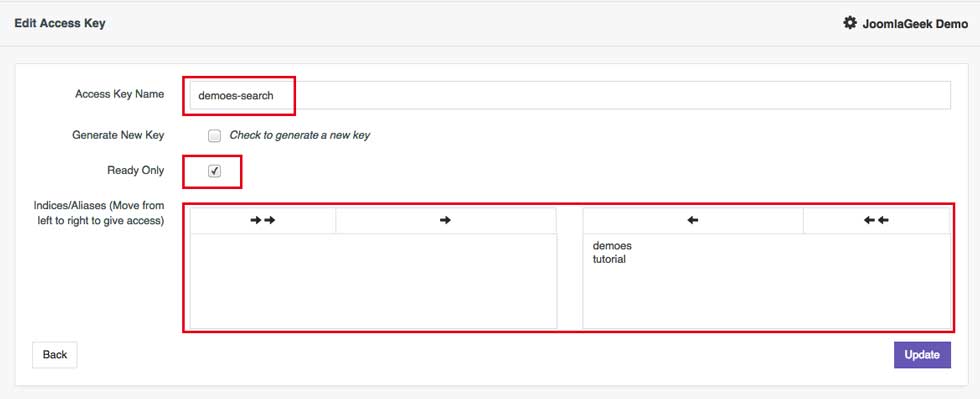
- Type Access Key Name
- Check for Read Only option
- Select indices that you grant access for.
- Choose Create
-

- On the next screen. Copy the Connection URL and save it to a safe place. This URL will be used as Search Endpoint URL on the configuration page.
Configure Integration
- Copy Connection URLs of Private Access Key and Public Access Key and enter them correspondingly to Endpoint and Search Endpoint params on Configuration form of Geek Elasticsearch component.
- Enter index name what you created to Index param.
- Save changes.
Configure Elastic Cloud Service
Elastic Cloud is the best way to consume all of Elastic's products across any cloud. Easily deploy in your favorite public cloud, or in multiple clouds, and extend the value of Elastic with cloud-native features. Accelerate results that matter, securely and at scale.
Create account
- Open https://www.elastic.co/cloud
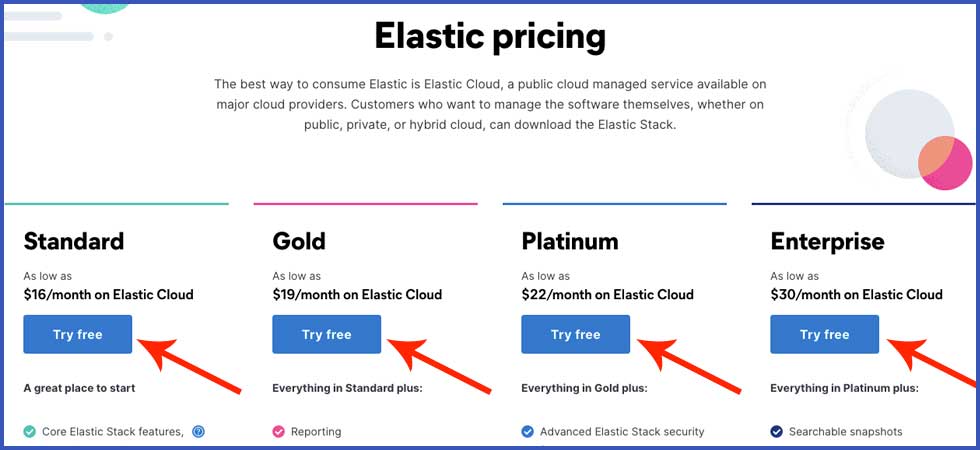
- Select menu Pricing to open Elastic Pricing page.

- On the Elastic Pricing page, select a plan that suits your needs.
- Choose Try Free button
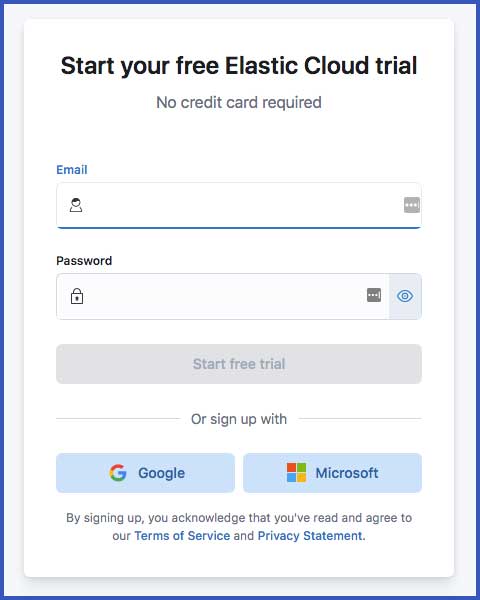
- You will be redirected to the Registration page.
- You can register new account with your email + password or sign up with your Google / Microsoft account.
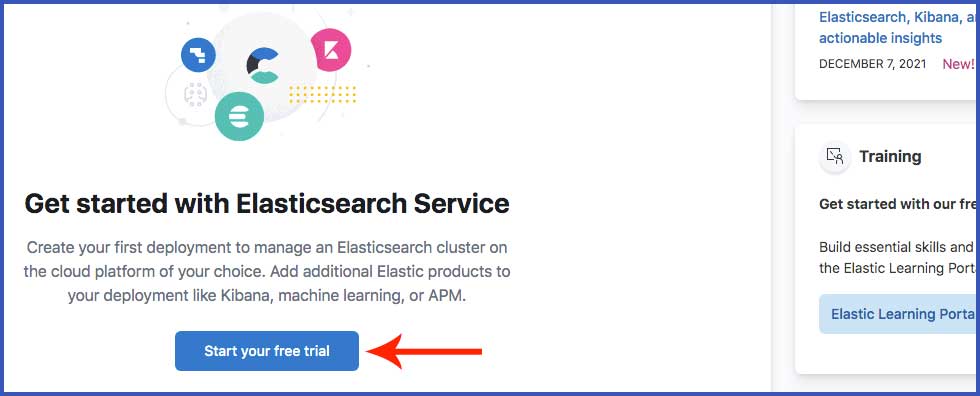
- After registration process completed, you will be redirected to the Elastic Cloud's dashboard.
- Choose Start your free trial button to create your first deployment.
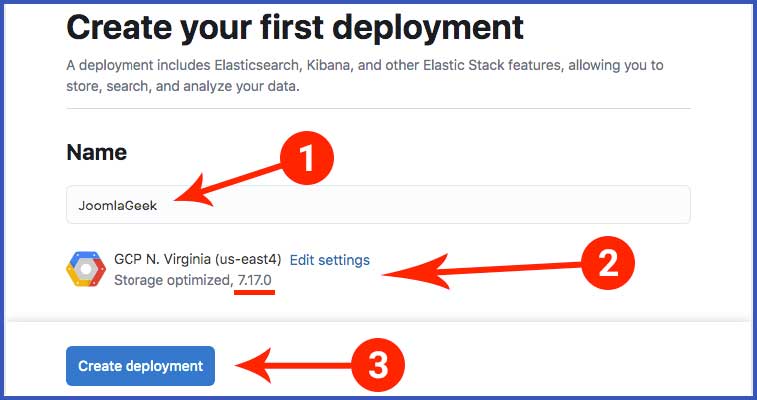
Create Deployment
- On the screen Create Deployment:
- 1. Enter Deployment Name.
- 2. Click Edit Settings to open Edit Deployment Settings page where you can change settings of Storage, RAM, CPU, Available Zones...
- 3. Choose Create Deployment button.
Save Credentials
- The creating deployment process will take about 5 minutes to complete.
- On this screen, you can see the credentials to access your deployment.
- Download these credentials and save them in private place.
- You will need these credentials to configure Username + password in the component's configuration page.
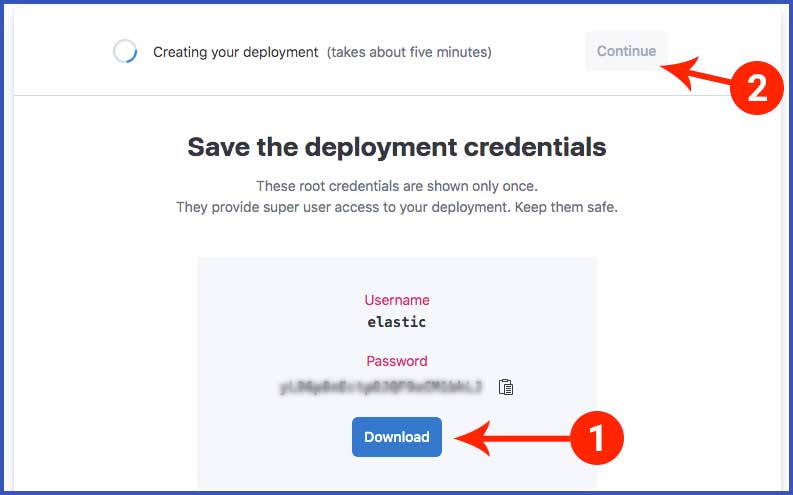
- When your deployment is ready. Choose Continue button.

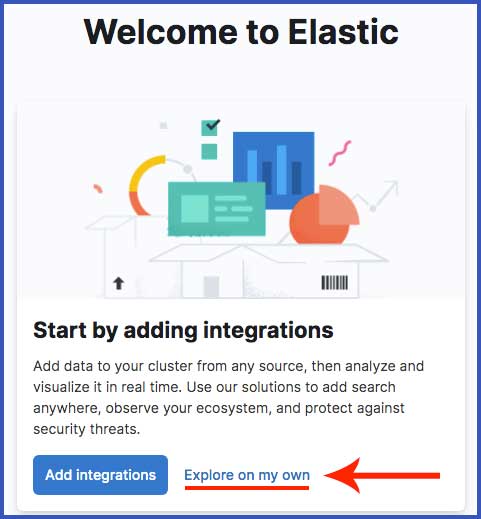
- On the next screen. Choose Explore on my own link to open Welcome Home page of your deployment.
Create Enterprise Search
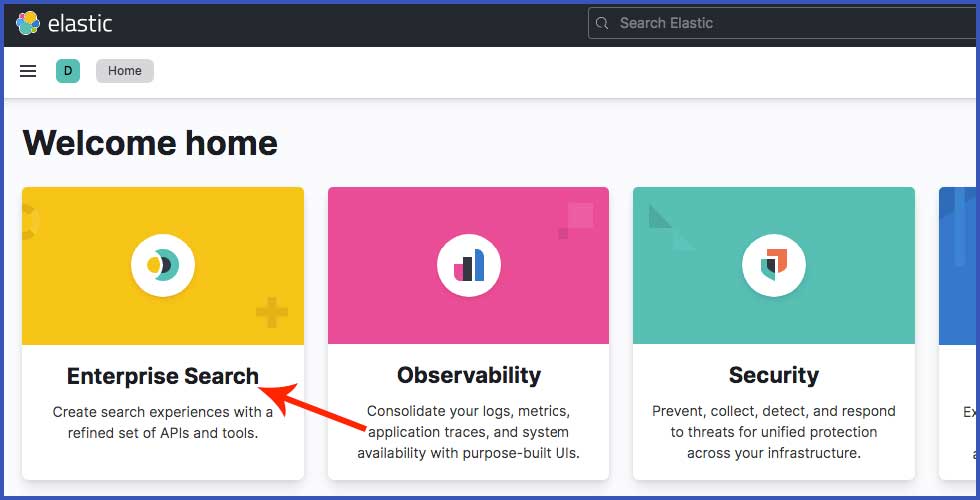
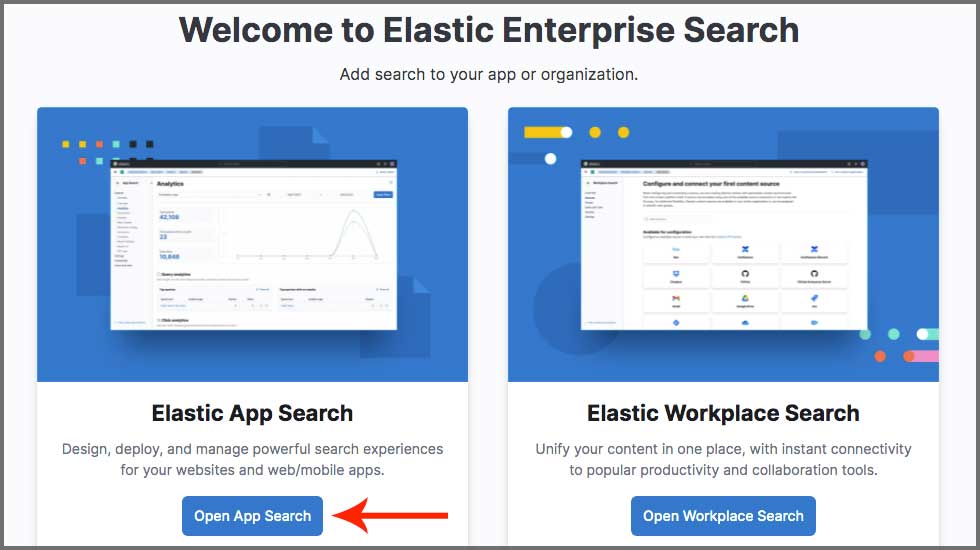
- On the screen Welcome Home of your deployment. Choose Enterprise Search.
- On the next screen, Choose Open App Search button in the Elastic App Search card.
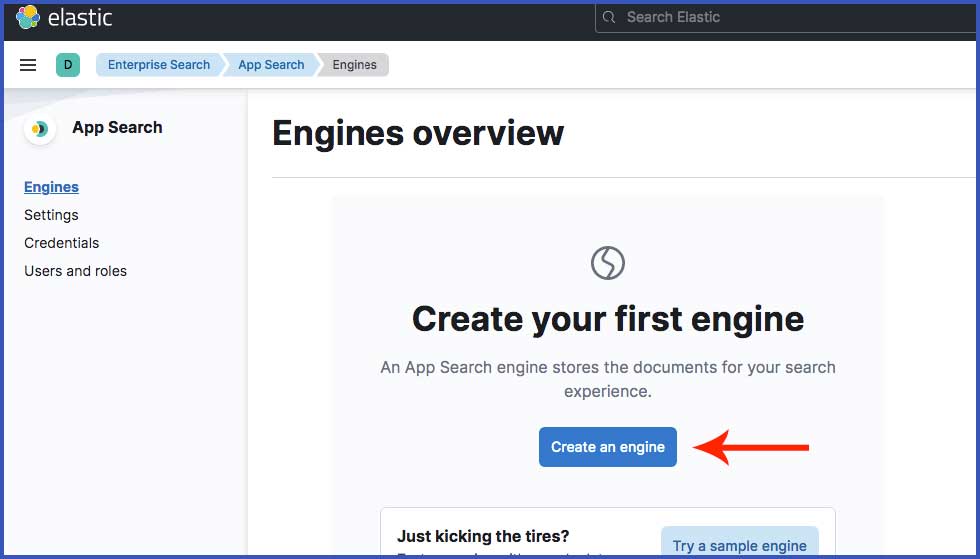
- You will be redirected to the App Search screen. Choose Create an engine button.
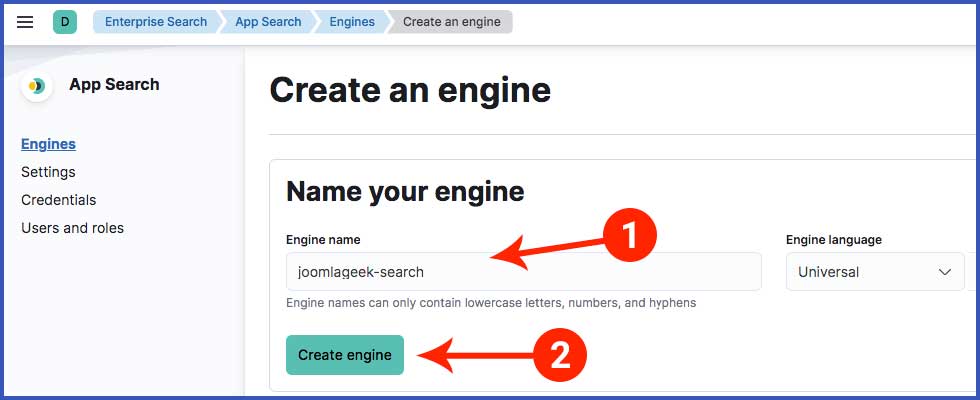
- On the Create an engine screen:
- 1. Enter engine name.
- 2. Choose Create engine button.
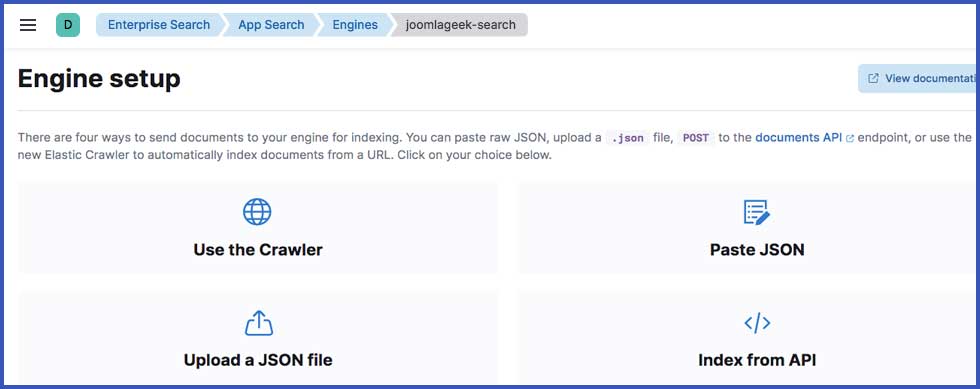
- After Engine created successfully, you will be redirected to the screen as below
Get Elasticsearch Endpoint
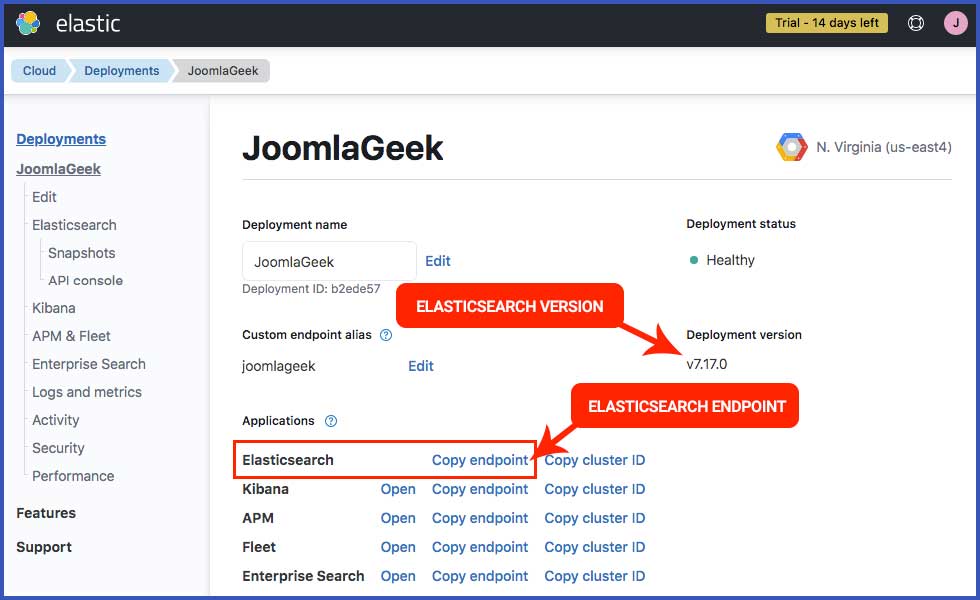
- After create Enterprise Search successfully. Navigate to your Elastic Cloud dashboard.
- https://cloud.elastic.co/home
- On the dashboard screen, Choose Deployment management of Deployment that you created.
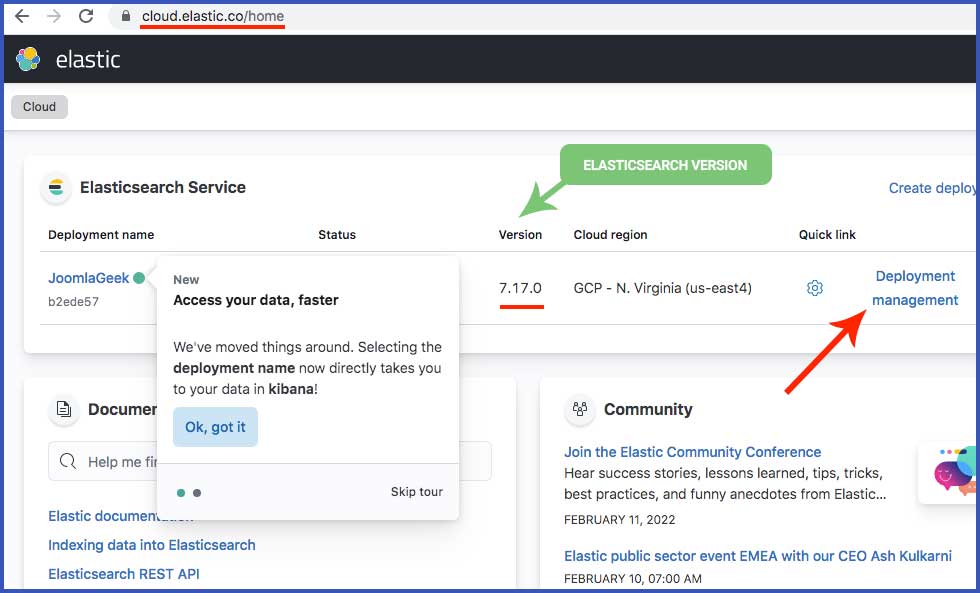
- On the Deployment management screen.
- You can find information of Elasticsearch version installed.
- Click to the Copy Endpoint of Elasticsearch application to get endpoint url of your Elasticsearch service.
- The endpoint url will look like this: https://xxxxxxxx.es.us-east4.gcp.elastic-cloud.com:9243
- You will need this information to configure Elaticsearch service in the component's configuration page.
Configure Amazon ElasticSearch Service
If you already have Elasticsearch service installed on your server or use Elasticsearch from another provider, you can use that one and skip this step. However, you need to manage permission to access your service by yourself.
On this documentation, we will guide you to create Amazon Elasticsearch service and manage its access policy.
If you are looking for an alternative provider of hosted search solution which is away from AWS, Searchly.com is an option that offer you a good service with a reasonable price.
Create AWS Account
- If you already have an AWS account, you can skip this step.
- When you sign up for Amazon Web Services (AWS), your AWS account is automatically signed up for all services in AWS, including AWS Elasticsearch Service (Amazon ES).
- To create an AWS Account
- Open http://aws.amazon.com/, and then choose Create an AWS Account.
- Follow the instructions to sign up. You need to enter payment information before using Amazon ES. There are no sign-up fees, and charges are not incurred until you create a Elasticsearch domain. You have to pay for the resources that you use only.
Create IAM Account
Services in AWS including Amazon ES, require you to provide credentials when you access them, so that the service can determine whether you have permissions to access the resources owned by that service. You can create access keys for your AWS account to access the API. However, we don't recommend you to access AWS using the credentials for your AWS account. We recommend that you use AWS Identity and Access Management (IAM) instead.
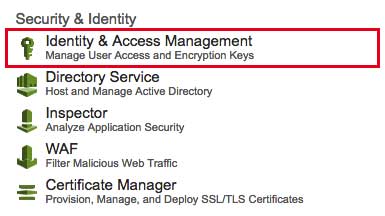
- Go to Console Home page
- Under Security & Identity, choose Identity & Access Management
-
- Or you can directly sign in to the Identity & Access Management (IAM) console at https://console.aws.amazon.com/iam/.
- On navigation pane, choose Users -> Create New Users.
-
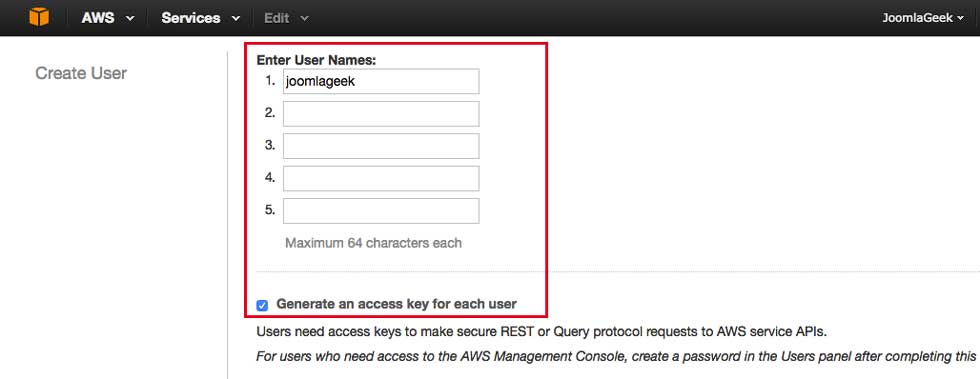
- In input text 1, type a username and check the checkbox Generate an access key for each user
- Choose Create
- Save Access key ID + Access Secret Key to the safe place on your computer, or you can click on Download Credentials button to download csv file.
-
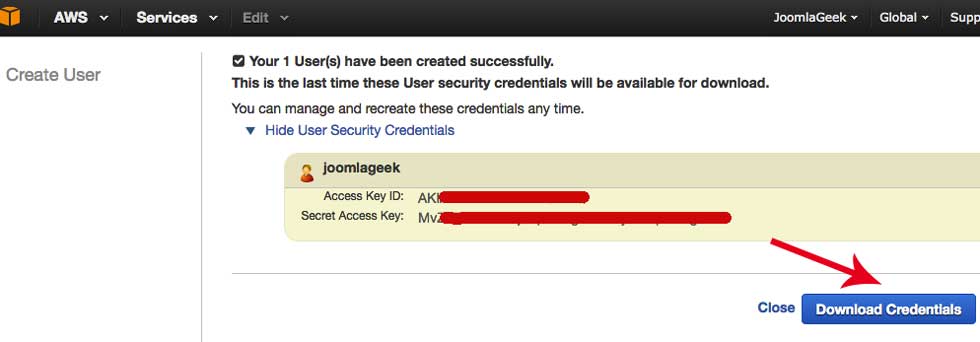
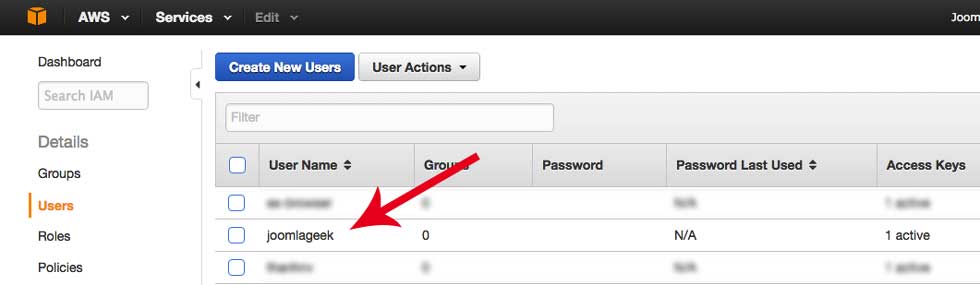
- Choose Close to return back to list of users page
- On list of users, choose the name (not the checkbox) of the user you created, you can use Search box to search for username.
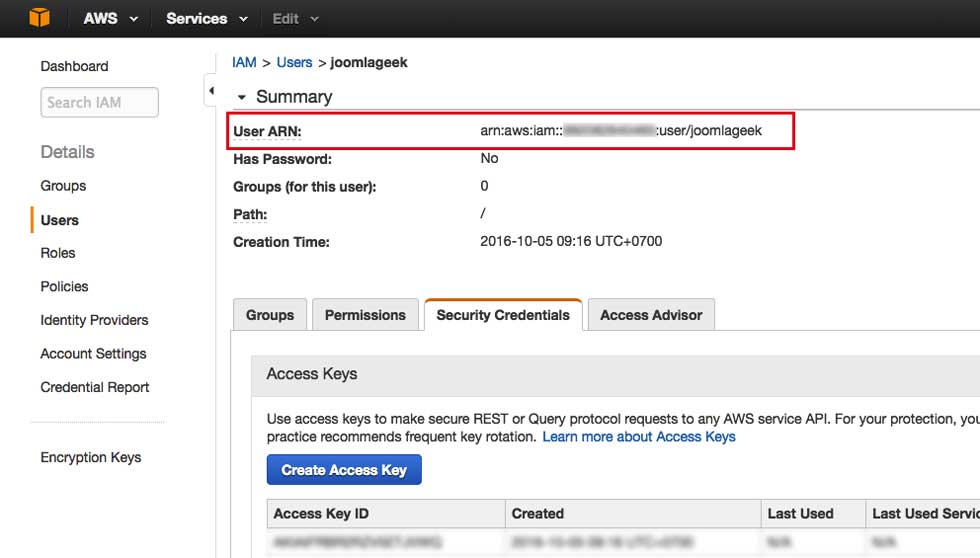
-
- On user detail page, Save User Amazon Resource Name (User ARN), you can also create another Access Key in this page
-
Create ElasticSearch Domain
- Go to https://aws.amazon.com
- Sign in to the console with your AWS account
- Select Region where you want to create Elasticsearch Service in.
- You can select region from Dropdown menu item (next to Support menu item) on the top menu
-
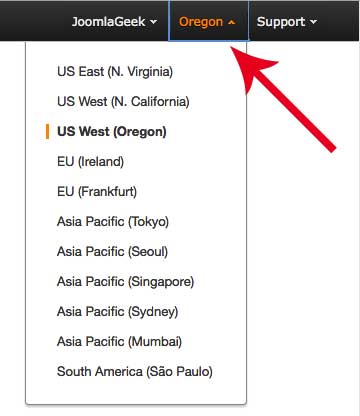
- Tips: you should select regions near your customers to reduce data latency of your applications.
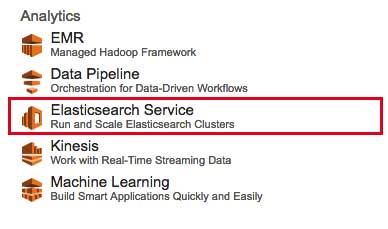
- Under Analytics, choose Elasticsearch Service.
-
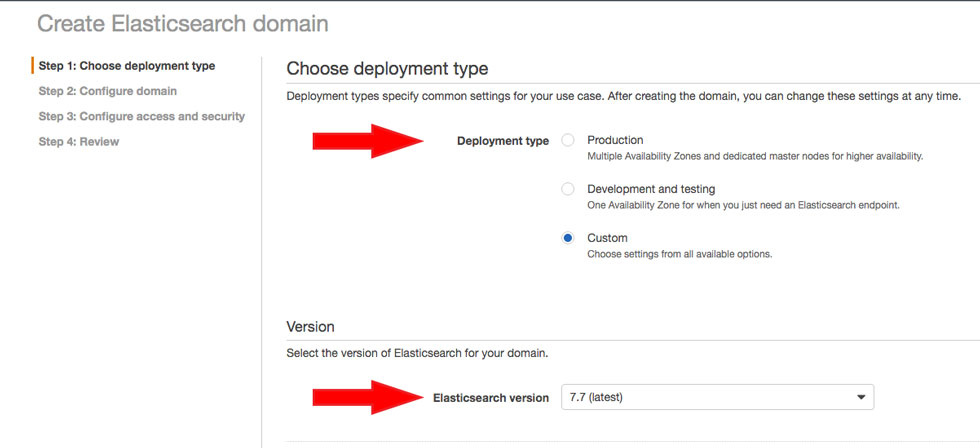
Step 1. Choose Deployment Type
Choose Deployment Type and select the Elasticsearch version for your domain.
Step 2. Configure Domain
- Domain Name: On the Define domain page, for Domain name, type a name for the domain. The name must start with a lowercase letter and must be between 3 and 28 characters. Valid characters are a-z (lowercase only), 0-9, and - (hyphen).
- For Instance type, choose an instance type for the Amazon ES domain.
- AWS Free tier
-
- If your AWS account is eligible for the AWS Free Usage Tier you can select t2.micro.elasticsearch (Free tier eligible) for Instance type
- The AWS Free Tier includes usage of up to 750 hours per month of a t2.micro instance type and up to 10 GB of Magnetic or General Purpose EBS storage. Lean more. Amazon Elasticsearch Service Free Tier.
- Choose Next

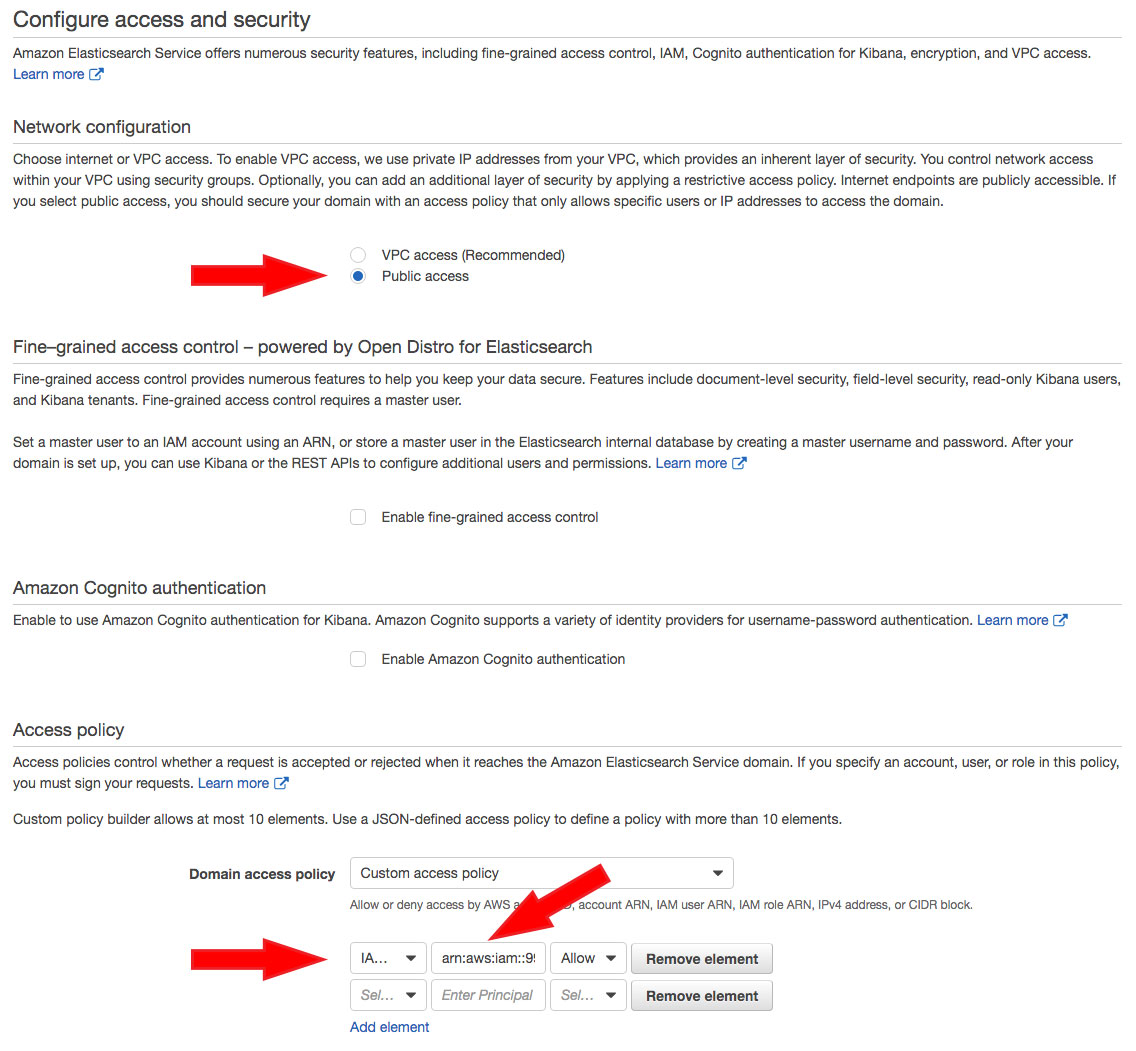
Step 3. Configure access and security
- Network Connection: Choose Public Access
-
Select Custom Access Policy, then use a Custom Policy Builder below to add element with following settings:
- Column 1: Select IAM User
- Column 2: Enter IAM User ARN (created above)
- Column 3: Select Allow
- Choose Next
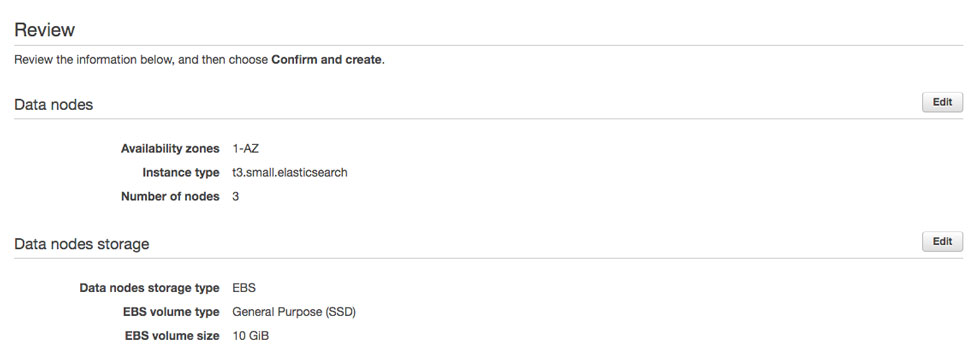
Step 4. Review
Review the information, and then choose Confirm to create a domain.
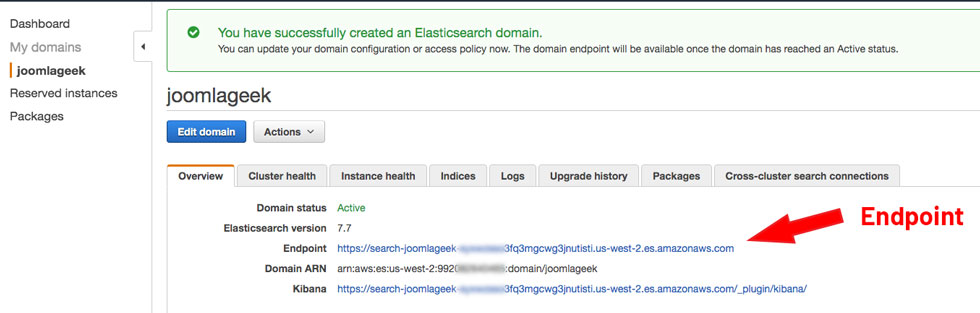
Step 5. Get AWS ES Endpoint
- Wait for about 10 minutes for the domain to be initialized.
- Once your AWS Elasticsearch domain is created successfully, you can get Endpoint URL of Elasticsearch domain.
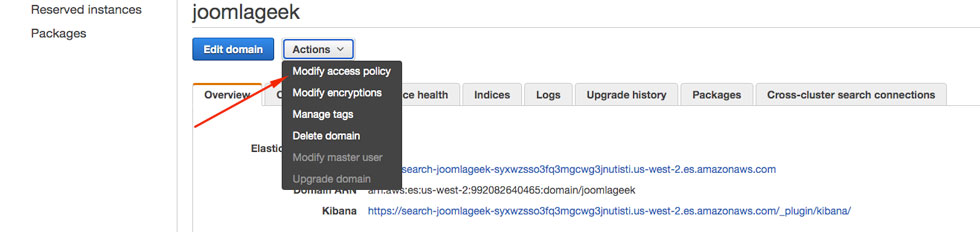
Step 6. Modify Access Policy
- In the Step 3. Configure access and security, we configured access to allow IAM User to have full access to domain. But in our case, everyone can also search data from front-end of website, so we will have to edit the access policy to do that.
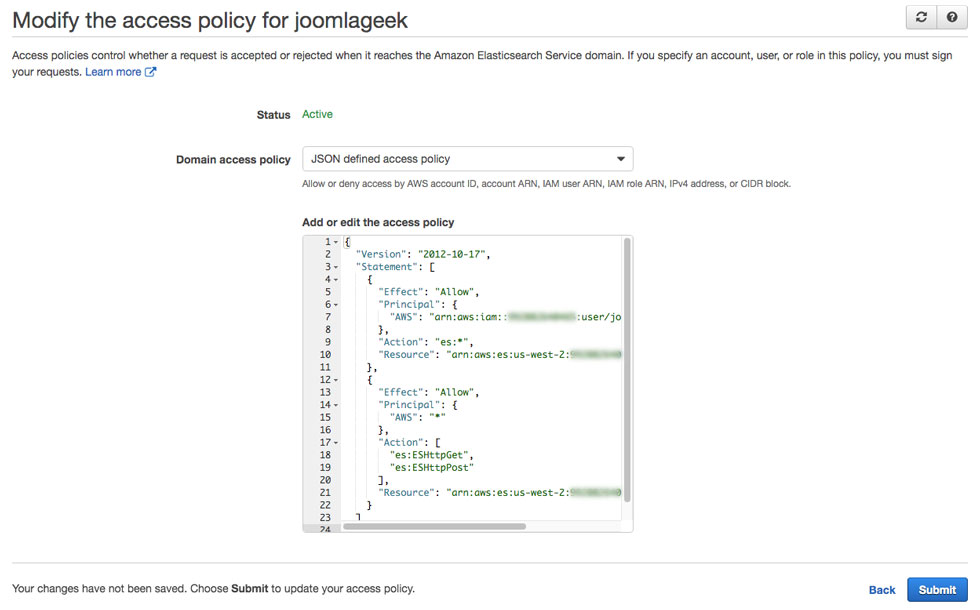
- Choose Actions > Modify Access Policy
- Copy and paste the JSON code below to replace the content in the textbox Add or edit the access policy
- Replace the [IAM_ARN] with your IAM user ARN, and replace [ELASTICSEARCH_ARN] with Elasticsearch ARN.
- Choose Submit to save changes.
Updated on May 28th, 2021:
AWS no longer enables anonymous access to the domain unless you add an IP-based condition to limit access from specific IPs or IP range. So, you will have to add IP-based condition to Access Policy code to grant HTTP GET and HTTP POST requests from your web server to Elasticsearch domain.
In the sample Access Policy code below, it will enable access from the specified IP range: 192.0.2.0 to 192.0.2.24
You have to replace this IP address with public IP address of your web server.
If you don't know what is public IP address of your website, you can create the file checkip.php, add content below to created file, then upload that file to root folder your Joomla website and open it on your browser, you will find an IP displayed there.
Note: Since the Elasticsearch domain will only allow access from IP of your website, therefor you will need to enable the setting "Send Indirect Request" in confirguration page of component.
<?php
echo file_get_contents('https://checkip.amazonaws.com/');
{
  "Version": "2012-10-17",
  "Statement": [
    {
      "Effect": "Allow",
      "Principal": {
        "AWS": "[IAM_ARN]"
      },
      "Action": "es:*",
      "Resource": "[ELASTICSEARCH_ARN]/*"
    },
    {
      "Effect": "Allow",
      "Principal": {
        "AWS": "*"
      },
      "Action": [
        "es:ESHttpGet",
        "es:ESHttpPost"
      ],
      "Condition": {
        "IpAddress": {
          "aws:SourceIp": [
            "192.0.2.0/24"
          ]
        }
      },
      "Resource": "[ELASTICSEARCH_ARN]/*"
    }
  ]
}
Avoiding Unexpected Charges
- AWS Elasticsearch Service Free tier enables you to create single-AZ t2.micro.elasticsearch instance. If you create more than one Elasticsearch domain, you will have to pay for what you use.
- Learn more about AWS Free tier limits https://aws.amazon.com/free/
- You can check your free tier usage on the Billing and Cost Management console.
- Read more about how to Avoiding Unexpected Charges
Install Component
- Download install package from our download section here
- Install it as normally via Joomla installer, it will install Geek Elasticsearch component and its all sub extensions.
Configuration
- Configure component
- How to access.
- Click on Options button at any screen of Geek Elasticsearch admin to access its configuration form.
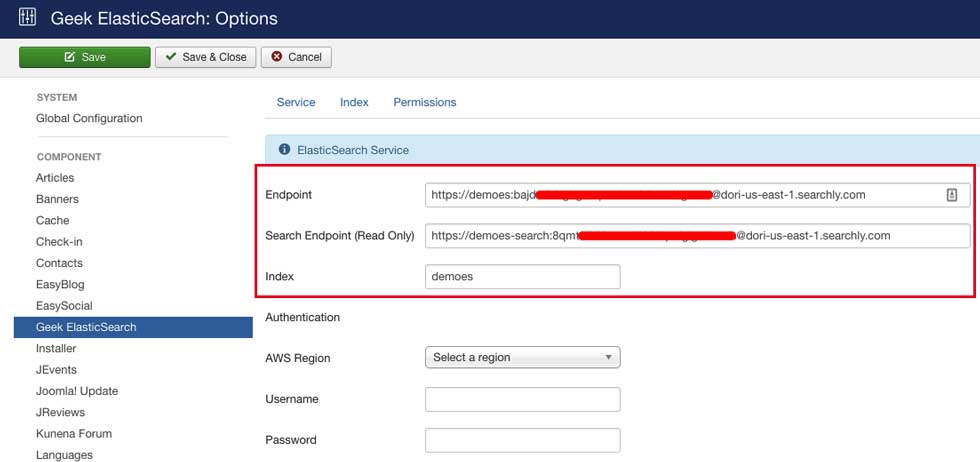
ElasticSearch Service

| Setting | Description |
|---|---|
Elasticsearch Version |
Select a version of Elasticsearch that you use. Depend on Elasticsearch service that you use, It can be a version of Elasticsearch installed on your server, or of AWS Elasticsearch Domain or of Searchly Search Space. Check Version Matrix first to select the ElasticSearch version that matches the version of PHP installed on your server. |
Endpoint |
An endpoint is a URL that is the entry point for an Elasticsearch service.
|
Search Endpoint |
For Elasticsearch service that provide different endpoint urls for search request and index request, such as Searchly.
|
Index |
Name of index where your data will be stored in. NOTE: an index is like a database in a relational database, you must use different index for each sites if you have multiple ones. |
AWS Region |
Select a AWS region where you create an ElasticSearch service in - See Create Elasticsearch Domain section (for AWS ElasticSearch service only). If you use other-AWS ElasticSearch service, you can ignore this setting. |
Username |
Enter the username for the user. |
Password |
Enter the password for the user. |
| Send Indirect Request (Send search request through server script) | By default, the search module will send direct AJAX request to ElasticSearch service. But if ElasticSearch service is behind a Firewall and it only allows access from specific IPs, then the direct ajax request from client won't work. In this case, you need to enable this setting, then the search module will send ajax request to your server, after then the server script will send request to your ElasticSearch service. |
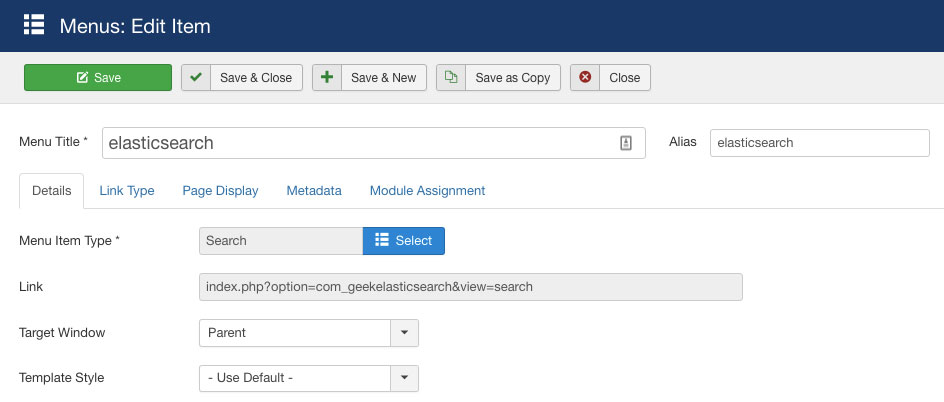
Create Menu item - Search Endpoint
IMPORTANT NOTE: If you enable the setting "Send Indirect Request", you need to create a menu item with type “Geek ElasticSearch > Search Endpoint”. This will help creating correct url for search endpoint.You can assign this menu item to the "Hidden Menu".

Index and search

| Setting | Description |
|---|---|
Last run index time |
The last time when index runs successfully. |
Indexer Batchsize |
The batch size controls how many items are processed per batch. Large batch sizes require lots of memory whereas small batch sizes require less memory but execute more requests which tends to take longer. |
Title Text Weight Multiplier |
The multiplier is used to control how much influence matching text has on the overall relevance score of a search result. A multiplier is considered in relationship to the other multipliers. The title text comes from the title of the content. |
Body Text Weight Multiplier |
The multiplier is used to control how much influence matching text has on the overall relevance score of a search result. A multiplier is considered in relationship to the other multipliers. The body text comes from the summary and/or body of the content. |
Path Text Weight Multiplier |
The multiplier is used to control how much influence matching text has on the overall relevance score of a search result. A multiplier is considered in relationship to the other multipliers. The path text comes from the SEF URL of the content. |
Enable Logging |
Enable this option to create a log file in your site's logs folder during the index process. This file is useful for troubleshooting issues with the index process. It is recommended that logging be disabled unless necessary. |
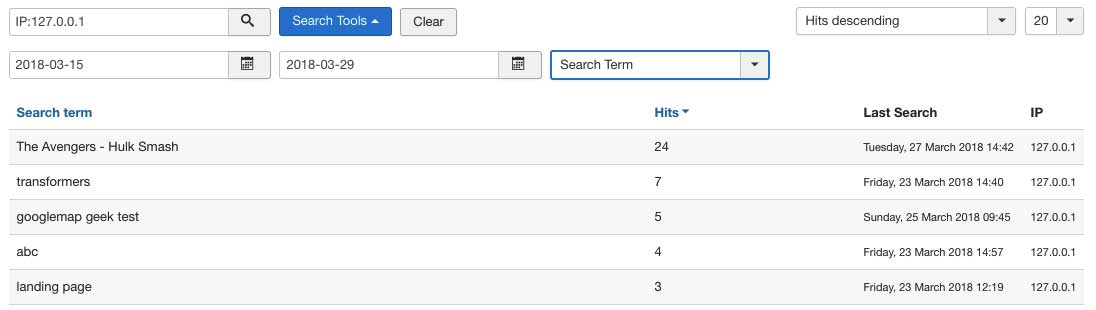
Search Analytics
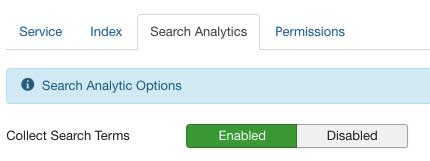
| Setting | Description |
|---|---|
Collect Search Terms |
Enable this option to collect search terms submitted by users. Then you can filter and analyze search terms on this page. |
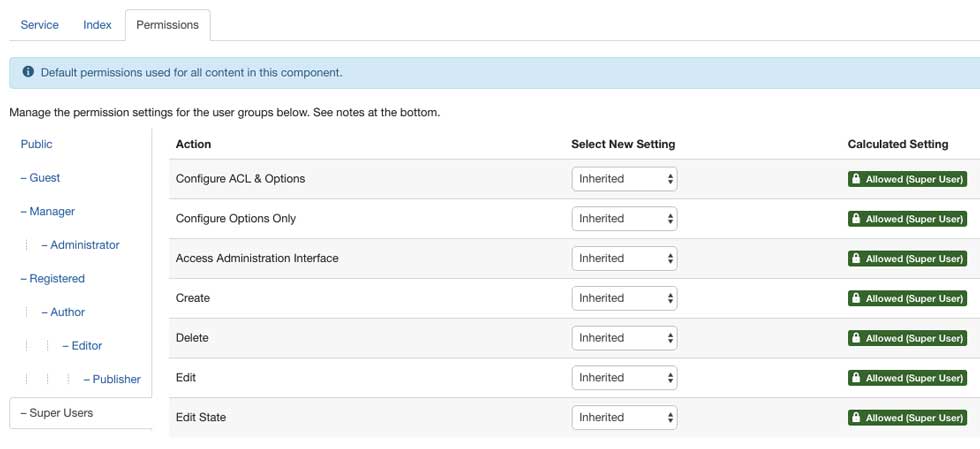
Permissions
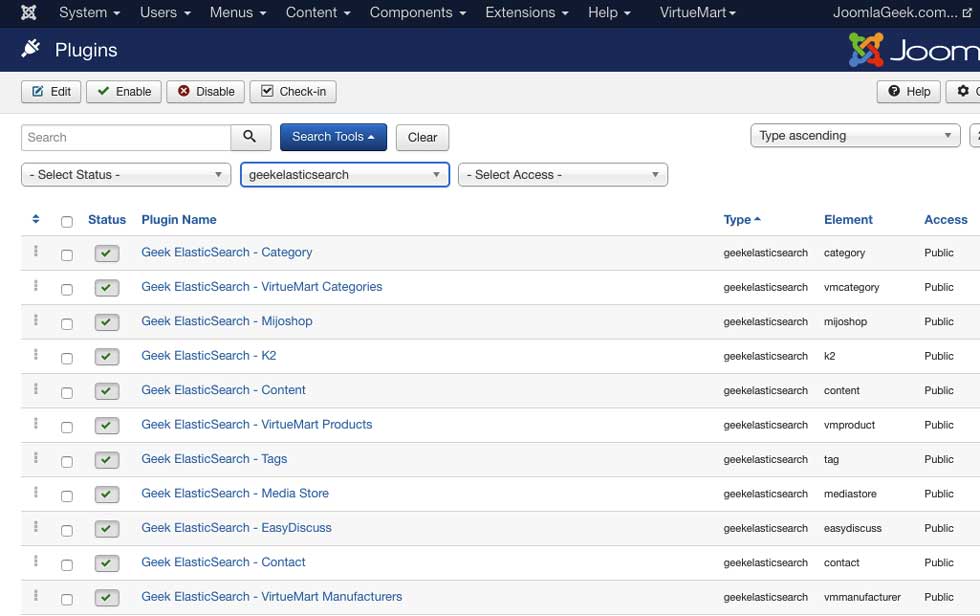
Enable indexing plugins
- The Indexing plugins are which the logic is built to search for items from specific component and return them to Indexer to update the ElasticSearch index. Without these plugins, data from a component cannot be indexed and processed during searching from the Geek ElasticSearch search form.
- On Dashboard of component, click on Manage button on Indexing Plugins section to open plugin manager pages where you can enable / disable plugins associated with components that you want their data will be indexed in Elasticsearch.
- IMPORTANT NOTE!: enables only indexing plugins for 3rd components what are installed on your site.
-
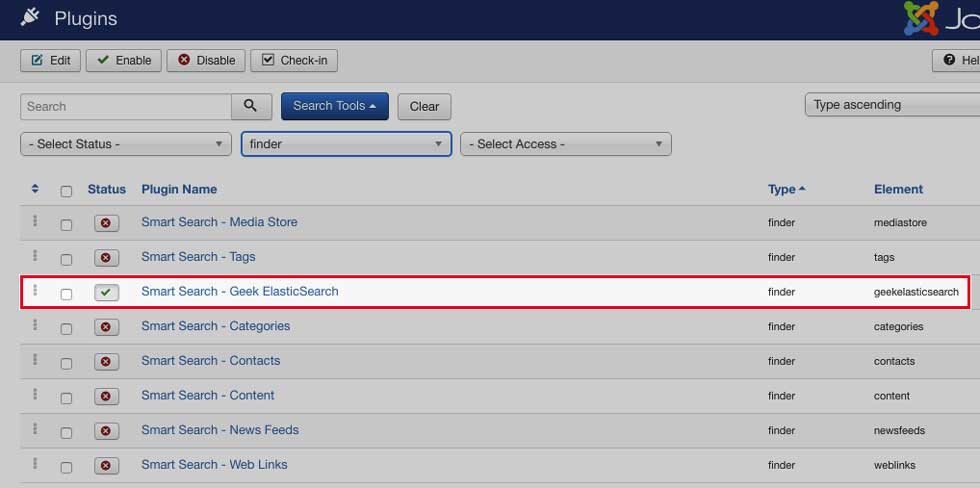
Disable Finder (Smart Search) plugins
- Because we will use Geek Elasticsearch to replace Joomla Smart Search, it is no longer need to update Joomla! Smart Search index and you can disable all Finder plugins but Smart Search - Geek ElasticSearch to ignore unnecessary process.
-
Trigger Events Plugins
- These plugins provide functions which are triggered during the content creation process of Joomla! components and immediately update the ElasticSearch index.
Run Indexer
- Once you completely setup Elasticsearch service and configure component as well as enable indexing plugins, you need to run indexer to index data in Elasticsearch.
- There are some ways and options to run indexer:
Run full index:
- Click on Index button on toolbar at any screen of component. It will re-index all content of your site.
Run incremental index:
- Click on Incremental Index button on toolbar at any screen of component. It will index only new content and update content from Last indexing time run .
Setup cron job:
- Geek ElasticSearch supports Trigger Events Plugins that help ElasticSearch index up-to-date automatically whenever content items are amended. However, there are some 3rd components not support these Trigger Events plugins to trigger its content creation process or there are some circumstances which you need to re-run the indexer.
- You can do this manually using Index / Incremental Index toolbar button on the Geek ElasticSearch admin page. You can re-index content automatically by running indexer as a command-line application. This makes it particularly convenient to run the indexer from a cron job.
- All hostings support to create cron job, but there might be difference of how to create. If you don’t know how to do that, you can ask your hosting provider. The Create a Cron Job form is look like image below
-
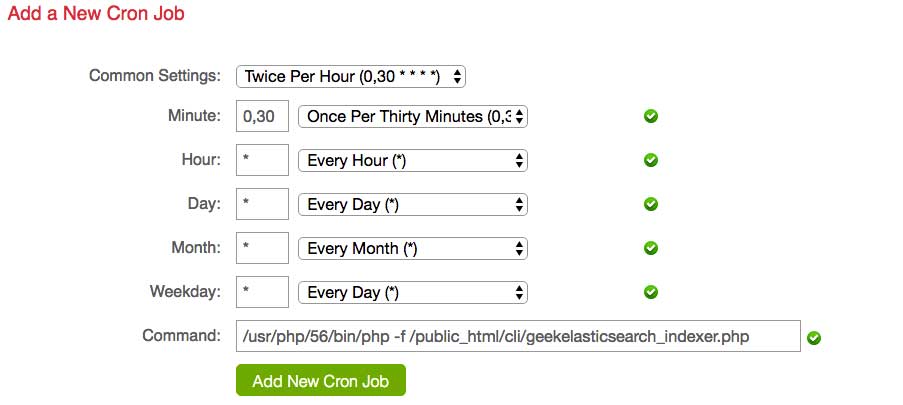
- You need to specify the time or times when the job is run and the command to run.
- For the command, you can copy it from Dashboard page on Geek Elasticsearch component admin, it is look like as below
- /path/to/php -f /home/www/demo/cli/geekelasticsearch_indexer.php
- Replace the /path/to/php with path to the PHP 5.5.0+ (Because application requires PHP 5.5.0+ to run). Ask your hosting provider for this path if you do not know where this path is.
- NOTE: crontab will always run incremental index.
Manage indexed content
- This screen shows a list of all the content items indexed in ElasticSearch.
-
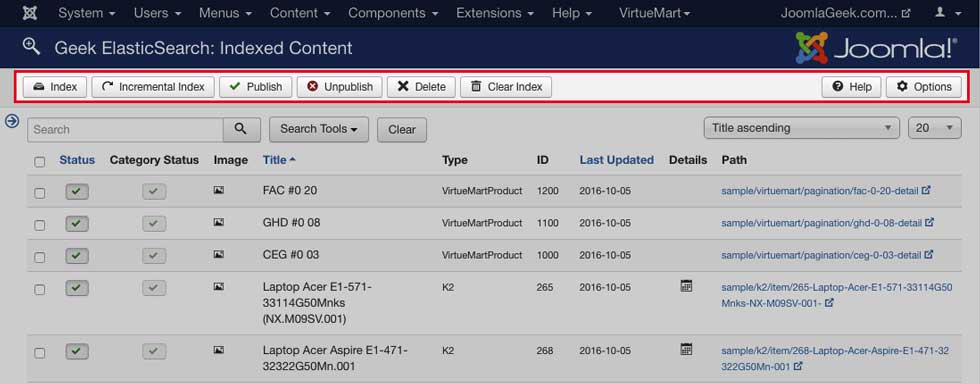
- Index - runs the Geek Elasticsearch Indexer. A small popup window will appear with a progress bar which illustrates the indexing process working through the content on your site. Do not close this popup window until the process is finished. On sites which have large amount of content it may take a long time for the indexing (tens of minutes).
NOTE: Geek Elasticsearch indexer can be run from the command-line interface (CLI) if required. See Setting up cron job section for more detail. - Incremental Index - runs the Geek Elasticsearch Indexer, but it only update the index for those content items that have changed since the index was last updated.
- Publish - makes selected items available to visitors on your website.
- Unpublish - makes the selected items unavailable to visitors on your website.
- Delete - deletes the selected content items. Works with one or multiple content items selected. Deleting a content item from Elasticsearch only deletes it from the index and does not affect the content item itself.
- Clear Index - you use this feature when you need to completely clear all the existing index entries before completely rebuilding the index.
Create and publish module
- Go to modules manager page.
- Create new instance of Module Geek Elasticsearch.
- Update settings for Search icon, search form and search result to suit your need.
- Publish and assign module to module position on your template.
Update Index Settings
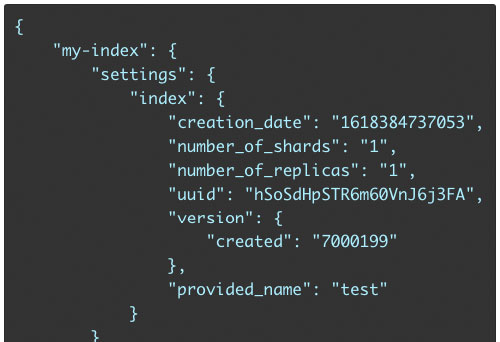
On this screen, the left column shows the current settings information of the index, and the right column shows the form where you can add and put settings to your index.
"Update Index Settings" is an advanced feature that enables to take full advantage of Elasticsearch’s abilities. It enables you to configure the analyzer for the index, to change Character Filters, Tokenizer and Token Filters to meet the requirements of search that your website needs.
You have to add settings in JSON format from the code editor, then click on the "Put Settings" button to send an updated request of index settings. If your settings arevalid and updated successfully, you will see the new updated settings on the left column.
This is an advanced feature, in order to use this feature, we assume that you have basic knowledge of configuring Elasticsearch. So if you have no idea how to use this feature, please do not put any update settings to avoid unexpecting errors.
Some example of analyzers
Elasticsearch provides some built-in analyzers for your reference. You can copy sample settings from the guide pages to update your index settings.
Please NOTE that Geek ElasticSearch does not support specify analyzer for the fields, it uses default analyzer for all text fields by default. So instead of creating custom analyzers, you need to update the default analyzer, and new settings will be applied to all fields without a need for updating mapping.
For more details, when you copy settings from the Elasticsearch guide page, you need to replace the name of the custom analyzer to “default”. For example if the sample settings code is:
"analyzer": {
   "rebuilt_arabic": {
     ...
  }
}
You need to replace the name of analyzer that is "rebuilt_arabic" to "default" as follows:
"analyzer": {
   "default": {
     ...
  }
}
Language Analyzers
Language Analyzers are a set of analyzers aimed to analyzing specific language texts. The following types are supported: arabic, armenian, basque, bengali, brazilian, bulgarian, catalan, cjk, czech, danish, dutch, english, estonian, finnish, french, galician, german, greek, hindi, hungarian, indonesian, irish, italian, latvian, lithuanian, norwegian, persian, portuguese, romanian, russian, sorani, spanish, swedish, turkish, thai.
ASCII Folding Token Filter
The ASCII Folding Token Filter converts alphabetic, numeric, and symbolic characters that are not in the Basic Latin Unicode block (first 127 ASCII characters) to their ASCII equivalent, if one exists. For example, the filter changes à to a.
This means that you can search accent-insensitive, for example if the document contains the text:
Vous êtes le Phénix des hôtes de ces bois.
Then you can use searchwords below to find it:
etes, Phenix, hotes
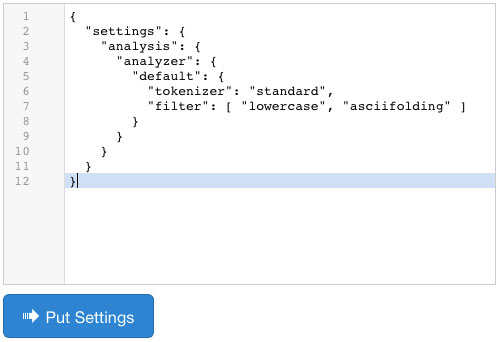
You can use the settings below to enable this feature:
{
  "settings": {
    "analysis": {
      "analyzer": {
        "default": {
          "tokenizer": "standard",
          "filter": [ "asciifolding" ]
        }
      }
    }
  }
}
Lowercase token filter
The Lower Token Filter changes token text to lowercase. This will enable the implementation of incase-sensitive search
For example, you can use the lowercase filter to change THE Lazy DoG to the lazy dog.
In addition to the default filter, the lowercase token filter provides access to Lucene’s language-specific lowercase filters for Greek, Irish, and Turkish.
You can use the settings below to enable this feature:
{
  "settings": {
    "analysis": {
      "analyzer": {
        "default": {
          "tokenizer": "standard",
          "filter": [ "lowercase" ]
        }
      }
    }
  }
}
You can also use many token filters together as follows:
{
  "settings": {
    "analysis": {
      "analyzer": {
        "default": {
          "tokenizer": "standard",
          "filter": [ "lowercase", "asciifolding" ]
        }
      }
    }
  }
}
NOTE:
After the index settings updated successfully, You might need to re-index data to get new changes applied in documents.
IMPORTANT NOTE:
Configuring Elasticsearch is out of our support scope. So, you need to update your index settings by yourself.
If you need us for this help, please submit a request for Elasticsearch - installation service to
Search Analytics
- This screen enables you to filter and analyze users' search terms to better understand what they are looking for on site.
- Note: You need to enable Collecting search terms setting on configuration page to get search terms collected. This setting is disabled by default.
-